
A Leek and Mustard Tart
Even though it is late August, I still occasionally feel the urge to turn on the oven and make my life just a little more sticky and uncomfortable. Tarts are one of my favorite baking mediums, particularly the savory variety. Once a tart is baked, it is great to have around, paired with a simple green salad as a classy lunch, served in a thin wedge with a glass of crisp white wine as an appetizer, or eaten cold out of hand as an on-the-go breakfast.
This recipe originally came from one of Deborah Madison’s early cookbooks. As a vegetarian during much of my youth, I was used to more hippie-type cooking (think Moosewood), and so when I read The Greens Cookbook in 1987, I was blown away. Hers were the first elevated and truly gourmet meatless recipes that I had ever seen. If you are a vegetable lover and haven’t read any of her work, please check her out. Her stuff is seriously inspirational. I have made this tart a million times and gradually adapted it as my own over the years.

I know that not everyone is comfortable with pastry, and tart pans can seem intimidating if you’ve never used one before. This pastry comes together quickly and is pretty forgiving. You don’t even need to roll it out or use those annoying little pie weights (which I will admit I’ve never owned in my life)! Sadly, the length of the recipe also makes it look difficult, but that is only because I am making it super specific for beginners. If you are an old hand at pastry, just make it however you like best.
The filling is quick and straightforward and the results will make you feel like you are sitting in a countryside bistro in the south of France. In fact, go get the bottle of rosé first, and chill it while you are making the tart. When it has cooled down enough to cut, grab your loveliest wine glass, a small plate, a blanket and find yourself the grassiest and most bucolic place to enjoy your beautiful creation.
Leek and Mustard Tart
(Adapted from Deborah Madison and Edward Espe Brown’s The Greens Cookbook)
Ingredients
Tart Crust
10 oz Gluten Free or all purpose flour (about 2 cups)
1/2 teaspoon of salt
7 oz cold unsalted butter, cut into small chunks (approximately 1 1/2 sticks)
1/2 cup of cold water with a few ice cubes
Filling
4 cups of thinly sliced leeks, white parts only, washed thoroughly to remove any dirt
1 tablespoon of butter
1 tablespoon of EVOO
1/2 teaspoon of salt
A few grinds of pepper
1/2 cup of white wine
2 tablespoons of white wine vinegar
2 eggs
1/2 cup heavy cream (see next ingredient note)
1/2 cup of creme fraiche or sour cream (you can also omit the previous heavy cream in the list and go for a full cup of creme fraiche or sour cream)
1/2 cup grated cheese (emmanthaler or gruyere please, but you can do goat, cheddar, or whatever you like, really)
2 tablespoons coarse Dijon mustard
1 tablespoon smooth Dijon mustard
2 tablespoons of minced chives, or parsley
1 teaspoon of minced tarragon
Equipment: 9 inch tart pan or pie plate
Method
Make the crust first.
Heat the oven to 375°. With food processor, pulse flour and salt with butter until the mixture is like very coarse cornmeal with some small pea-sized chunks. Pour in a few spoonfuls of the ice water and pulse again. Keep carefully adding small amounts of water until the dough just comes together. (If using a fork or pastry blender, work fast and blend the fat into the flour until it is the same consistancy as stated above. Stir the water in with a fork until the dough comes together). Quickly press the crust into the pan, keeping the dough to an even 1/8 inch thickness. Stick the whole thing into the freezer quickly and leave for about 15 minutes or so. Get a piece of tin foil the size of the pan and push it into the dough, leaving a little overhang. With a fork, pierce the bottom of the tart dough, about 5 times. Stick in the oven for around 20 minutes, until when you peek under the foil, the dough is dry looking and very light brown. Take out of the oven and cool for a few while you make the filling. Keep the oven on if you are going to bake the tart now!
Heat a large non-stick frying pan at a medium heat and add the butter and oil, when melted, add the leeks, salt and pepper. Stir for 10 minutes or so and then add the wine. Keep stirring for another 5-10 minutes, until the wine is evaporated and then add the vinegar and cook for a minute or two more. Find a medium sized bowl and break two eggs in and beat them for a couple of minutes with a fork or whisk. Add the cream combo, grated cheese, mustards and leek mixture and stir to combine. Pour into your crust and sprinkle the top with the herb(s). I usually stick any pie or tart onto a sheet pan that has been lined with foil, to avoid disastrous oven scenarios, so go ahead if you like. Stick in the oven and bake for around 20-30 minutes, until it is light brown on the top and stops jiggling when you give the pan a shake. Cool on a rack for as long as you can stand it and then get yourself to that bucolic location and pour the wine!

A simple and subtle olive oil cake
My life in the kitchen began as a baker. I was eight years old and had been following my grandmother around her kitchen well before that. She was a great cook and food enthusiast, having spent time in France and also growing up with her grandmother Gesine, who was another amazing lady in the kitchen. Marjorie was a renegade around food, making up dishes and playing loose and fast with recipes. But she told me this about baking: “the first time, follow the recipe exactly, as though you are a scientist in a lab. After that, you can make changes until that recipe becomes your own.”

I have always followed her advice and recommend that you do too. In general, I also think it’s smart to read a new recipe a few times before starting out, particularly with baking, because there will always be one small, unexpected detail waiting to trip you up. Another habit I have is to gather all of the ingredients before I start working (paying attention to the minutiae of things like room temperature eggs and how chilled or not your butter should be).
All that said, this is a simple and elegant little cake. She looks a bit underwhelming at first glance, but a few bites in and you will become seduced by the subtle citrus and olive oil flavors and the slight crunch of cornmeal. It’s also a beauty in that it gets better and better with each day (really!). You can pretty her up with some berries and soft whipped cream or just cut a plain slice and have it as an afternoon snack with a cup of tea or glass of sherry, as my grandmother would have done.
Olive Oil Cake
Ingredients
3 large eggs at room temperature
- 3/4 cup sugar
- 1¼ cups olive oil
- 1 3/4 cups cake flour or GF
- 1/2 cup cornmeal
- 2 teaspoons baking powder
- ½ teaspoon baking soda
- ½ teaspoon kosher salt
- 1/4 cup grand marnier
- Juice and zest from 1 goodorange (about 1/4 cup of juice)
- 2 teaspoons vanilla extract or the seeds scraped from 1 vanilla bean if you are feeling rich
Method
Oven to 400°
Grease a 9 inch spring form pan with either olive oil, butter or cooking spray, and stick a round of parchment in the bottom (use a pencil to trace the bottom of the pan). Grease some more and if you like, sprinkle with some sugar.
Whisk the flour, cornmeal, powder, soda and salt together in a small bowl. In a very small bowl, combine the grand marnier, orange juice, zest and vanilla.
If you have a stand mixer, this is the time to lug it out and use the whisk attachment. If not, use a regular hand mixer and it will just take a little more time. In a big bowl, beat the eggs and sugar until they become very light colored, thick and creamy (think ribbons of batter that leave trails). A few minutes in a stand mixer, a few more than that with a hand mixer. Have your olive oil ready in a cup with a spout and very gradually drizzle it into your egg mixure (still mixing) until incorporated.
Beginning and ending with the dry ingredients, mix in the flour and liquid mixtures (alternating). Scrape the bowl with a spatula to make sure everything is mixed and pour into the pan. If you have any kind of decorative sugar, this is a good time to use it. If not, sprinkle the top of the cake with regular sugar and stick in the oven.
Immediately turn the heat down to 350° (or 325° convection) and bake for 30-40 minutes, checking early. It is done when the top is just springy and light golden brown. I have not had luck with a cake tester for this cake, but luckily it is pretty forgiving. Leave to cool for 10-15 minutes and then release from the pan and continue cooling on a rack. Carefully slide a spatula under it and move to a plate. It will keep for days, covered in plastic wrap or an air tight container.

A Throwback Goat Cheese Salad
There are a few things about this salad that scream “trendy foods of the past!” and there is also a classic element, hailing from bistros in France. Trends include the 1980’s American foodie tendency to fry goat cheese and put it in a salad (which is also the classic element, as we totally stole the idea from the French). Also, beets and cheese in salads came into popularity in the 80’s. Honestly I’m glad they did, because I adore the combination. And folks, two words: fried cheese.
A few imperatives for this simple recipe.
Get good goat cheese, season it, and chill the patties for at least 15 minutes before cooking.
Try to get the best lettuces you can, as they are the biggest player here. A mix of textures and colors work beautifully. I really prefer adult-sized leaves for this, but if you can only find young mixed greens, then go for it.
Invest in one great bottle of olive oil that you use only for salads.
Find a brand of champagne vinegar that you like and always have it on hand.

With a little forethought and a few good pantry ingredients on hand, you can have what I consider to be a perfect lunch. And I am totally gifting you my best salad dressing recipe. So, you’re welcome. Please make this salad at least once and let me know what you think!
Salad Greens and Beets with Crusty warm Goat Cheeses
Serves 2
Ingredients
4 heaping tablespoons of a fresh, soft goat cheese made from happy goats
1/4 teaspoon of salt and a grind of pepper
1 tablespoon of minced chives
1 small minced clove of garlic
1 egg, beaten with a spoonful of water, or a beaten egg white
1 cup of seasoned breadcrumbs in a shallow dish (panko, fresh homemade, or gluten free-I think panko has the best texture)
2 tablespoons of ghee, canola or olive oil
4-5 cups of washed mixed lettuces.
About a cup of your favorite beets, cooked in boiling salted water, skins on, until tender. Cooled and sliced in whatever way you think is most beautiful.
A small handful of chopped, toasted nuts if you like (I had some leftover walnuts)
Dressing
1 generous tablespoon of very finely minced shallots soaked in
1/4 cup of good champagne vinegar
1 teaspoon of Dijon mustard (creamy)
1 teaspoon of mild honey (or agave or sugar)
Salt and pepper
1/2 cup of good EVOO (approximately)
Method
Get a fork and a small bowl and mix the goat cheese with the seasonings. Have a small dish lined with wax or parchment paper ready. Quickly form into four small patties and dip into the egg and then panko. Place on the prepared plate and stick in the fridge for a MINIMUM of 15 minutes, better yet, an hour (sorry for yelling).
Wash and dry your lovely lettuces and make the dressing by whisking everything in a bowl till creamy.
Heat a small non-stick frying pan on medium/low for a couple of minutes. Add the fat and wait a minute. Get your chilled patties and place carefully into the hot fat and cook until each side is golden brown.
Dress the salad leaves and beets and compose in your favorite bowl. Add the goat cheeses and serve with a little more dressing on the side while the cheese is still warm.
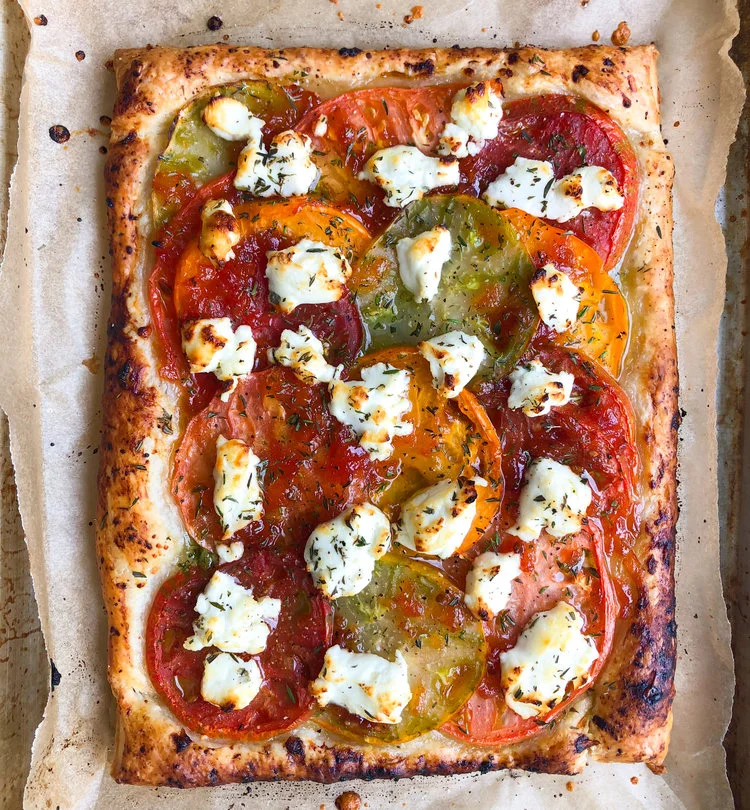
A Lovely Tomato and Goat Cheese Tart
Nantucket isn’t called the Grey Lady for nothing. On the loveliest of days, all of the houses are grey shingled and depending on the season, the landscape is quite grey as well. Add fog to the mix and you end up with a palette of palest silver to deep charcoal. For this reason, on grey August day #3, it was imperative that I find the best and brightest colors to bring to the table.

Happily, Bartlett’s Farm has a decent selection of heirloom tomatoes at the moment and so I decided to do the easiest and classiest thing and make an heirloom tomato, herb, and goat cheese tart. This falls right into my sweet spot-beautiful, delicious, seasonal, flexible, and impressive. I will tell you immediately that I already had a Dufour Puff Pastry in the freezer when I made this decision. That is the only part of the recipe I am going to be inflexible about (besides the part where you have the best tomatoes ever). Use a puff pastry that is made with real butter! That said, you can add all kinds of other embellishments, or none at all, and make it with only tomatoes, goat cheese (I am in love with this brand), and herbs. Your choice!

Look at those beauties!
I happened to have a few spoonfuls of grated parmesan, a tiny bowl of leftover arugula pesto (see the previous post about squash soup), a jar of tomato jam and a lovely few sprigs of fresh thyme. So those were my embellishments. Do what you like. Buy a container of pesto and use that, make a paste of parsley and chives from the garden and use it. Do you have a small hard piece of gruyere or cheddar that you will eventually toss out? Give it a new life and incorporate it into the recipe. Go wild!
Here’s how.
Summer Tomato and Goat Cheese Tart
Ingredients
1//2 of a Dufour Puff Pastry sheet, defrosted in the fridge for 3 hours
1 tablespoon of pesto (or none at all)
2 tablespoons of grated parmesan or pecorino ( or any other kind of cheese, or none at all)
3-5 beautiful and perfect tomatoes, sliced into about 1/4 inch rounds and laid out to drain a bit on paper towels
1 tablespoon of tomato jam, melted over a low heat (or hot pepper jelly, or none at all)
Around 3 tablespoons of very good goat cheese
1 tablespoon of chopped fresh thyme (or basil, or 1 teaspoon of fresh rosemary, or parsley…or none at all)
Salt and pepper
1 teaspoon of good EVOO
Method
Preheat the oven to 400° and set a rack right into the middle space. Line a 1/4 sheet pan (or larger sheet pan or cookie tray) with parchment paper. Carefully place the rectangular half of the pastry onto the parchment. If using, gently spread the pesto over the pastry, leaving 1/2 inch of border around the edges empty. If using, sprinkle the cheese over the pesto. Lay your beauteous tomatoes atop the pesto/cheese (or empty pastry) in any lovely pattern you like, leaving the border free. If you like and have it on hand, brush the melted tomato jam over the tomatoes. Crumble the goat cheese decoratively over that and sprinkle with thyme. Salt cautiously and wave the pepper mill over the whole thing. Right before sticking it in the oven, dribble the oil over your gorgeous masterpiece. Bake for about 20-30 minutes, depending on your oven, until the pastry is a deep golden brown and the borders are puffed. You want it to get as crispy as possible without looking burned. Serve hot, warm or room temperature and impress yourself or some lucky friends and family.

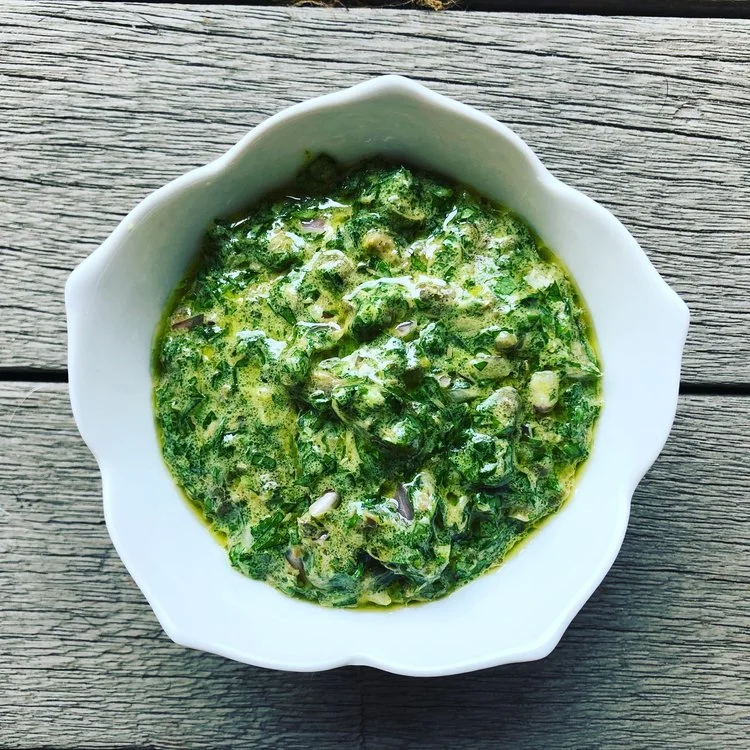
A Simple Summer Squash Soup
Well I guess if you complain enough, the hot weather eventually will become cold and grey, with a bitey north wind and spit-in-your-face precipitation. Lovely Nantucket!
On a positive note, the cool day gave me a chance to cook food and actually serve it hot. Yay! Best rainy day menu? Soup and a sandwich (okay, there was also a salad, because August-you know?). I looked around at Moor’s End Farm, took stock, and decided the soup would be summer squash and carrot, embellished with arugula pesto. The accompanying sandwich had to be Ruth Reichl’s infamous grilled cheese (don’t ask questions, just click on that link and make it as fast as you are able).

This technique is pretty standard. I could have used any allium or squash varieties for the soup. And the pesto variations are endless! (I’ll tell you all about pesto another day). The idea here again, is to not get wound up about having the exact variety of something. Try to roll with a growth type mindset as opposed to the fixed variety (that’s an education thing, kids).
In the meantime, try this soup on for size and let me know how it works for you.

Any Squash, Flexible-Mindset Soup
Serves 4
Ingredients
2 T ghee (or butter, or EVOO, or canola...)
1 leek (white to palest green part only), minced super finely (look on YouTube if you haven’t minced a leek before). Or use any other kind of onion you have on hand!
2 cloves of garlic, smashed, pressed, minced or grated
2 teaspoons of dried thyme (or 2 tablespoons fresh if you like)
3 medium carrots, scrubbed and roughly chopped (peel if you feel a desperate need)
1/2 a russet potato, peeled and chopped
3 cups of stock-I used chicken, but any kind will do. Or water!
1 bay leaf
3 small summer squash (or zucchini or patty pan...), roughly chopped (about 2+ cups)
1 cup of some sort of milk-dairy, soy, nut, coconut (I actually used cream, because I had some that needed to be finished)
Salt and pepper to taste
A few pinches of nutmeg (freshly grated is best)
Arugula Pesto (to finish)
1 clove garlic
1 tablespoon of nuts (I used toasted slivered almonds)
1/2-1 cup of arugula
1/2 cup EVOO
Salt to taste (about 1/4 teaspoon)
Method
Heat the fat at medium-low in a large skillet that has a lid (if no lid, a large sheet pan will suffice). Sauté the leeks for a few minutes, stirring, until soft. Add the garlic next, stirring still for just a minute, and then the thyme for another few seconds. Throw in the carrots, potato, bay leaf and stock, and crank the heat till it boils. Cover, turn down to lowish heat so the moisture simmers enthusiastically, and cook until the root vegetables are tender. Add the squash, cover again and leave till cooked through. Probably another 10-15 minutes.
While the soup is cooking, quickly whip up the pesto, either by using your fabulous knife skills and muscle, a mortar and pestle, or a food processor. The idea is to first chop/mash/pulverize the garlic and nuts together into a paste. Then stir/mash/add in the very finely minced arugula and salt. Pour in the oil last, stir to mix, and salt to taste. Set aside.
After the squash is tender but not mushy, remove the bay leaf, add the milk and carefully purée the mixture, either using an immersion blender, Vitamix, or regular blender. Taste for salt and give a grind of pepper. If it’s still hot, serve right away. If not, transfer it to a saucepan and keep warm over a very low heat. Serve with the arugula pesto, dolloped on top prettily.
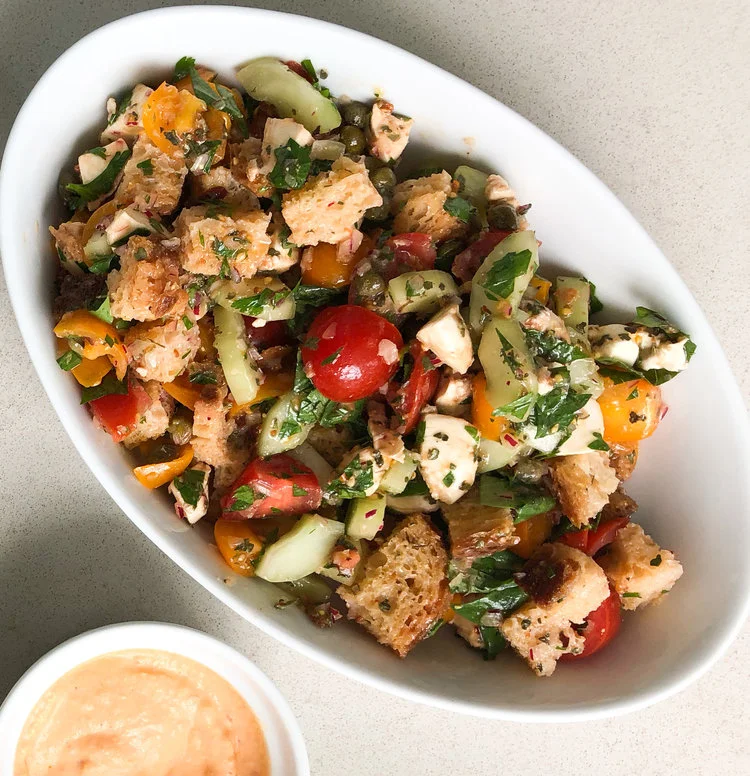
Panzanella Salad
I simply love a dish that is not only beautiful, delicious, and flexible, but that also uses food that might otherwise be thought of as past it’s prime. Consider the lovely and frugal Panzanella Salad. She will gladly showcase your stale bread and wilty herbs, and you could even oven roast a subpar tomato for this one if necessary. The only ingredients that must be excellent are the mozzarella and olive oil. Really! And did I mention you don’t need to turn on the stove? Get on it while the tomatoes are still at your farmer’s market!

Panzanella Salad
Feeds about 2-4
Ingredients
2 Big slices of good, stale country type bread, cut or torn into bite sized pieces (you can also dry your bread out in the oven, but that means turning your stove on!)
2 cups of tomatoes of all types, cut to a similar size as the bread
6-8 small mozzarella balls (bocconcini) , sliced into rounds
1/2 cup finely diced onion (red or white) covered in red wine vinegar to soak for 10-15 minutes
1 cup of peeled and seeded cucumber, cut into small half rounds
1 clove garlic, grated, minced or smashed
1 teaspoon Dijon mustard
1 teaspoon dried oregano
1/2 cup EVOO (your very best!)
1/2 cup chopped fresh parsley
1/2 cup chopped fresh basil
salt and pepper to taste
Method
In a large bowl, toss together the bread, tomatoes, and mozzarella. Drain the onion, reserving the vinegar, and add that to the mixture. Now, either using a whisk and bowl, or handy small food processor type machine, make the dressing, using the garlic, mustard, oregano, 1/4 cup of reserved vinegar, and EVOO. Mix the dressing into the salad (I use my hands and will say this is the best way to toss and dress every salad!). Add the remaining ingredients and let it sit for at least 15-20 minutes. If it’s hot as hell outside, I sometimes even chill this for an hour (a crime in some peoples books). Serve it on a bed of greens if you like.
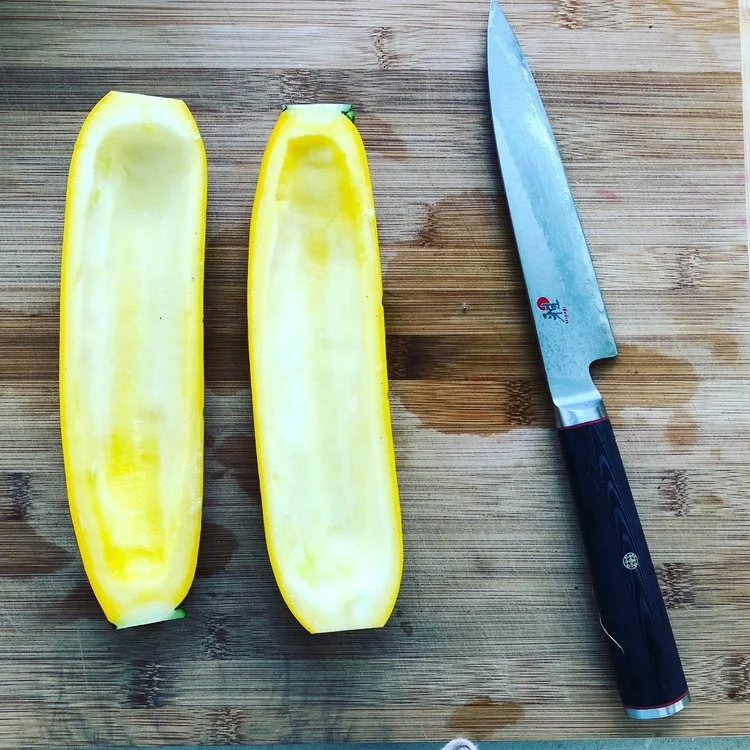
Stuff a zucchini!
Have you ever opened the door to leave your house and been surprised by a mysterious bag of zucchinis? Well, I have. It’s a great trick that folks with prolific gardens like to play, and some of those suckers are as big as a Louisville slugger! My grandmother did this occasionally, and once we received an anonymous bluefish in return! She laughed her head off and went on to fillet that bad boy and make her famous Blunafish Salad for lunch...
We all have our go-to summer squash recipes. A few of mine include gratins, fritters, a raw salad made with zoodles (man, I hate that word!), and a new-to-me dish by Ottolenghi that I absolutely adore. By late August, you’d think I’d have had enough, but yesterday I grabbed a bright yellow zucchini, the kind with slightly tougher skin, and decided it needed stuffing.

Stuffing is awesome, because the ingredients can be whatever you’re feeling that day. Yesterday I was all about using the Italian chicken sausage with kale that was in the freezer. Tomorrow it could be an all-mushroom affair. The next day, maybe crabmeat. Again, the alliums can be whatever you have or prefer, leave out the pepper if you don’t have one (or use the awesome roasted ones from a jar that I love so very much), do homemade, gluten free or Japanese breadcrumbs...The choices are all yours! Yay!

So, go now and look in the fridge to see what you’ve got, and follow these basic steps.
Stuffed Zucchini
Serves 2 as a main with a few salady sides (double or triple if you have a crowd!)
Ingredients
1 beautiful medium zucchini, or any other summer squash that you have. I used one that was around 8 inches long
1 teaspoon of Kosher salt
1 tablespoon of ghee, EVOO, butter, or light oil
1 cup of any fresh mushroom, minced finely
A splash of leftover white wine (like 1/4 cup at the most)
1 medium shallot or other allium, minced (about 1-2 tablespoons)
1 tablespoon of minced red, yellow, or orange pepper
1 clove of garlic, minced
1 large link of sausage (your choice), out of the casing
1 teaspoon of anchovy paste
1 teaspoon of red wine vinegar
1/2 cup of panko (I used GF)
1/4 cup of Parmesan (or some other cheese that you like)
A handful of minced parsley and any other herb you love. I also used a little thyme in this one.
Method
Preheat the oven to 350° (I used the convection bake setting). Cut the ends off of the squash, leaving a tiny bit of the stem. Use a teaspoon to scrape out the seeds, leaving enough flesh for a sturdy structure. Slice the thinnest, tiniest piece from the bottom of your boat, so that it will sit upright without tipping over. Save about 2 tablespoons of the flesh and chop it up. Salt the inside of your boat with the salt and turn upside down on a kitchen or paper towel for about 10 minutes, and then pat dry.
Heat the fat over a medium heat in a medium skillet, add the mushrooms and stir until they lose their liquid and start to brown a little. Throw in the splash of wine and let it cook down. Add the shallot, minced red pepper, and garlic and stir for a minute to soften. Crumble in the sausage, breaking it up with a wooden spoon into very small pieces. Sauté until it’s just cooked through and scrape everything into a bowl. Stir in the anchovy paste and vinegar and taste for salt and give a grind of pepper. When you are ready to bake, gently fold in the panko, cheese and herbs. Place on an oiled sheet pan and drizzle the top with a tiny bit of EVOO.
Bake for around 20-25 minutes, until browned and heated through. Serve hot or at room temperature. They reheat well too.
The amazingly versatile green sauce
Salsa Verde, Sauce Vert, Chimichurri, Chermoula…Every cuisine seems to have a green sauce, made with fresh and/or dried herbs, some sort of acid, an allium, a salty element, and oil to emulsify. I personally probably rely on this sauce a little too much, because it’s easy, impresses (some) people, can often be made with items on hand (including herbs from your crisper that are past their best age), and is also eternally flexible.

Some uses for green sauce: topping roasted/grilled/poached seafood or meats, adding to grilled or roasted veggies to brighten the flavors, mixing into homemade mayonnaise for a fancier tartar sauce, folding into pasta with some peas and prosciutto for something your guests will want to know more about…I tend to make more than I need for one time and then use it up flavoring other dishes, including crab cakes, fritters, all manner of slaws and potato salads…You get the drift: easy, useful, and delicious.

If I am feeling virtuous, I make this entirely by hand. If I’m in a rush, I make it in the Cuisinart or even Vitamix which gives a more polished, smooth consistency. Again, I can’t stress enough the flexibility of a recipe like this. If you don’t have shallots, use any other kind of onion (vidalia, shallot, red onion?). If you don’t have parsley, use cilantro. No olive oil? Canola oil will do. Free yourself from the constraints of uptight recipes! Break the chains and see what happens!
Green Sauce #143
Ingredients
1/2 cup finely minced parsley
1/2 cup finely minced basil
2 tablespoons of minced capers (I used smaller ones in brine)
1 small shallot, finely minced (about 1 tablespoon)
The zest and juice of one lemon
1 tablespoon of good Dijon mustard
a few good pinches of sugar
1/2 cup or so of good EVOO
a pinch of salt and good grinding of pepper
Method
Whisk everything together in a bowl and chill. You can also forgo the mincing and dicing and throw everything in a machine and pulse till the sauce is a consistency that you like. Use in new and exciting ways and then let me know all about it.