Corn Fritters from my Grandmother Marjorie
As a child, I knew my grandmother’s zucchini were out of control when the “pancakes” started showing up on the table at meal times. They were made in the same vein as her potato latkes, light and crispy-almost frilly-around the edges. Some had dill and a little cottage cheese and others had chives and no cheese at all. I grew up watching Marjorie make these kinds of recipes up, or so it seemed. Turns out, she had a general idea of the ratios for certain dishes and they could be used across a multitude of main ingredients, in this case the pancake (or fritter, as I came to know them). So, the same thing happened when her corn came in and we never complained one little bit.

Last week the corn came in at Bartlett’s Farm. This is a BIG deal on the island (I feel that it is an equally big deal when the corn at Moor’s End comes in too). I happened to be at the market when the young man wheeled the first cart up to the corn table and I asked if that indeed was the first of the year. He nodded yes and handed me an ear, smiling. I am going to admit that I had a moment where I was all like, “where’s the newspaper guy with a camera? I HAVE THE FIRST EAR OF CORN!” Yeah, I felt that I deserved a little fame for getting up early and being in the right place at the right time. Sadly, the press had NOT been alerted, and so I went on my way and took that bunch of corn and did the first thing I do every July. I made a batch of fritters and served them to my gracious clients for lunch. And said a quiet thank you to my kitchen angel, Marjorie, without whom I wouldn’t have a clue about food. Thanks, Gram. This one is for you.

Corn Fritters
Ingredients
3-4 ears of corn, shucked and kernels removed in the least messy and chaotic way you know how (no comment from me here-I tend to have sporadic luck in this department)
2-3 scallions, minced nice and fine
1/2 of a roasted red pepper (freshly made or from a jar-your choice-we just like the hint of red here)
A handful of minced chives (or any other green herb you like)
One handful of flour, I use the GF Cup-3-Cup kind, but any kind of regular flour works too
1 t baking powder
1 egg, beaten
An optional 1/2 cup of feta or other crumbly white cheese (I only do this occasionally and typically when the corn are getting older)
Salt and Pepper to taste
Yellow Oil or Ghee for frying
Method
This is literally the easiest thing in the world. Mix the first four ingredients and sprinkle the flour and powder of them and toss with a large fork. Add the egg and cheese if you are using and salt and pepper. Heat a nice large skillet over a medium heat-cast iron is best-until a drop of water dances on the surface. Pour enough oil or ghee in the pan to cover the bottom generously. Drop between an 1/8 to a 1/4 cup of the corn mixture onto the skillet and cook until brown, flip and set onto a warmed plate (you can keep them warm in a low oven if you like).
I serve these in different ways. Sometimes, I grill a piece of fish and do a fresh salsa, occasionally I get fancy and do smoked salmon, creme fraiche, pickled red onions and minced fresh dill, other times, a nice crispy chicken thigh and some sweet chili sauce does the trick. They are such a great vehicle for sauces and protein sides...Experiment, please! And let me know what you think.
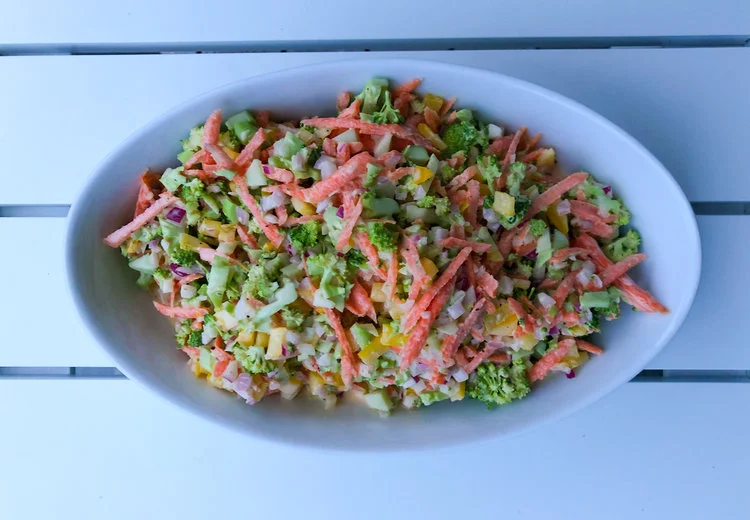
Broccoli Slaw
One of the curses AND gifts of being a private chef is that you have the freedom to make different foods everyday and to experiment with new recipes or ideas that intrigue you. I have made so many different types of slaws over the years-a few from glossy photos in magazines, some from those old timey church lady cookbooks, Instagram-inspired slaws (of late), and occasionally you make a slaw out of whatever it is that you can find in the vegetable bin at that particular moment.
On Nantucket this summer, the combination of terrible winter weather, cold and endless spring and foggy/damp summer has affected the growing season. While we are still not seeing field tomatoes at the farm stands, I have seen broccoli, and it is gorgeous! So, to make a long story short, here’s broccoli slaw!

Kitchen Sink Broccoli Slaw
Ingredients
About two cups or so of broccoli florets, cut as tiny as you dare
A large carrot, grated over the largest holes of the box grater
1/2 each of a green and red pepper, in a tiny dice
A good handful of red onion, also in a tiny dice, soaked in a few tablespoons of red wine vinegar for 5 minutes and saved (see below)
Dressing
1/3 C buttermilk
1/3 C Mayo (mine was homemade garlic aioli from another recipe)
1/4 C of red wine vinegar (include the vinegar you will drain from the onions)
A very healthy squirt of honey-I used hot honey, which is chili infused and costs the world at a fancy food shop
Two big fistfuls of fresh green herbs-parsley, cilantro, chives, tarragon, mint? Be bold and decide for yourself!
Salt and pepper to taste
Slivered almonds or any other nut, toasted to throw on top if you like (I had some and forgot!)
Method
Gently combine the salad ingredients and then whisk together the dressing ingredients and taste-add more acid or sweet as necessary. Thin with a little water if it seems too thick. Dress the salad carefully-start with less and add a bit at a time to avoid the overdress! Pile it in a bowl and chill. If you have something crunchy to top it with, do that right before you serve

Last-Minute Chicken Pasta Salad
Last minute is a key phrase that comes up frequently in the life of a private chef. You can be the most hyper-organized, vigilant list-making, pantry-stocking, backup-shopper and there will always be those days where you think you are all set and suddenly you are not. Well, yesterday was one of those days for me.
The summer on Nantucket is glorious. And it is also crowded as hell with the worst traffic you can imagine (think no traffic lights, historically small streets, touristy drivers and too many rotaries). Doing errands is a strategic undertaking, where you have to plan for time of day, route, and of course, delivery days for specialty (and non-specialty) items. Well, I tried to start early and didn’t have a 100% clear idea of what was needed for lunch, but I made an executive decision on the fly that I felt would be well-received. As I was leaving the store, I suddenly received a text asking for something completely different-"chicken and some sort of pasta”. Okay, deep breath and onward. Onward to the rotisserie chicken aisle, that is.

I recently made a delightful zucchini pasta dish by Yotum Ottolenghi, that was featured in NYT Cooking. Riffing on his idea of a room temp pasta, sauced with an herby/capery/lemony combination and combined with grilled summer squash, I took a similar approach. I was able to get this on the table in 25 minutes, using an already cooked chicken and having some pesto in the fridge.
Here you go, kids.
Last Minute Chicken and Pasta Salad
Ingredients
1 store-bought rotisserie chicken, shredded into medium bite-sized pieces
1 cup of any kind of pesto (I had arugula on hand)
1 box of penne pasta (GF or regular)
3 T red wine vinegar
1 bunch of basil, whizzed in a blender or processor with a cup of EVOO
2 small-medium sized yellow and green summer squash, ends cut off and sliced lengthwise about 1/4” thick and grilled outside or on a grill pan, until browned and cooked through
1/2 roasted red pepper from a jar, diced
1/2 jar capers
Zest of one lemon
a few good squirts of white balsamic glaze
a large handful of minced parsley
Salt and Pepper to taste
Buratta-1 or two, depending on how decadent you are feeling
Method
Fold the pesto into the chicken. Cook the pasta till al dente, drain, and sprinkle it with the vinegar and about 1/2 cup of the basil oil. Chop the squash into 2-3 inch pieces and throw that in with the chicken, along with the red pepper and zest. Then combine the two mixtures, add the balsamic glaze, parsley, and taste for salt and pepper. Arrange this mess in a beauteous bowl and carefully tear your expensive Buratta and scatter it artfully over the top of the salad.
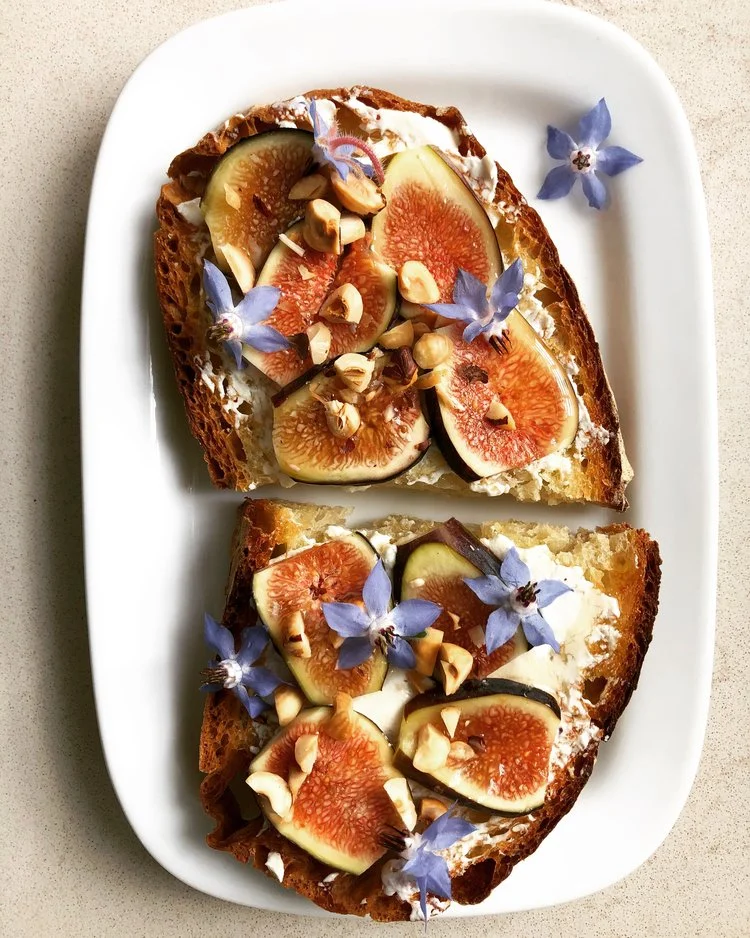
The alchemy of savory toasts
A few times a week I like to conjure up a fancy savory toast for my client. Sometimes the toast is an afterthought-a realization that the table needs just one more tiny addition. Sometimes the toast is IT-the center of the luncheon universe. Today, It was more the latter. The surrounding dishes were lovely and tasted delightful, but didn’t have a lot of personality (sorry chicken and macaroni salads!). I felt an urge to create something with a little more depth and personality, and so foraged through the fridge until I came up with a winning combination.

My amazing daughter baked the bread for this one. I then went to town with goat cheese, figs, hazelnuts, and wild borage flowers. It was finished with balsamic glaze and more oil from the marinated Chevoo Goat cheese jar...
I believe there are a few truths that are inherent in a good savory toast. One of course, is the bread. Please find a bread that was baked by someone who cared. Find a bread that you would eat as a plain piece of toast and really taste the soul of the flour, yeast, salt, water and hands that created it. It also must be sturdy, but not have too much going on. That done, the toppings (for me) tend to follow some sort of arc.

Umami bombs.
Something smooth and tangy (yogurt, cheese, a bean puree, etc..) is a good glue to add to the bread’s foundation. Today, I had the end of a lovely carton of homemade ricotta, and I simply grated some lemon zest straight into the container and swirled some olive oil and good salt along with it.
The next element is something umami, like mushrooms, smoked fish, or crumbled bacon. For this component, I sautéed shallots with a little garlic and tossed in some chopped fresh shiitake mushrooms. I blasted the heat and poured in the end of a bottle of chardonnay and finished with a little salt and some dried thyme. That mixture was then spooned over the thin schmear of ricotta.

These beauties required the unusual ingredient of zucchini jam, which sat atop some fresh goat cheese and was topped with a mixture of sherry vinegar and local honey. It was prettified with roasted red peppers.
From there, you can go more vegetal, either fresh or pickled. I chose marinated artichoke hearts, sliced any old way and laid down prettily on top of the mushroom mixture. To top your beauteous creation, you may sprinkle pretty edible flowers or herbs. To serve, drizzle something-balsamic glaze, pomegranate molasses, or just some good olive oil. And that’s it! I won’t make a table or a long list for you here. Just trying to guide you, give a little advice and let you take it from there. Experiment and make mistakes! That’s how you find the best combinations.
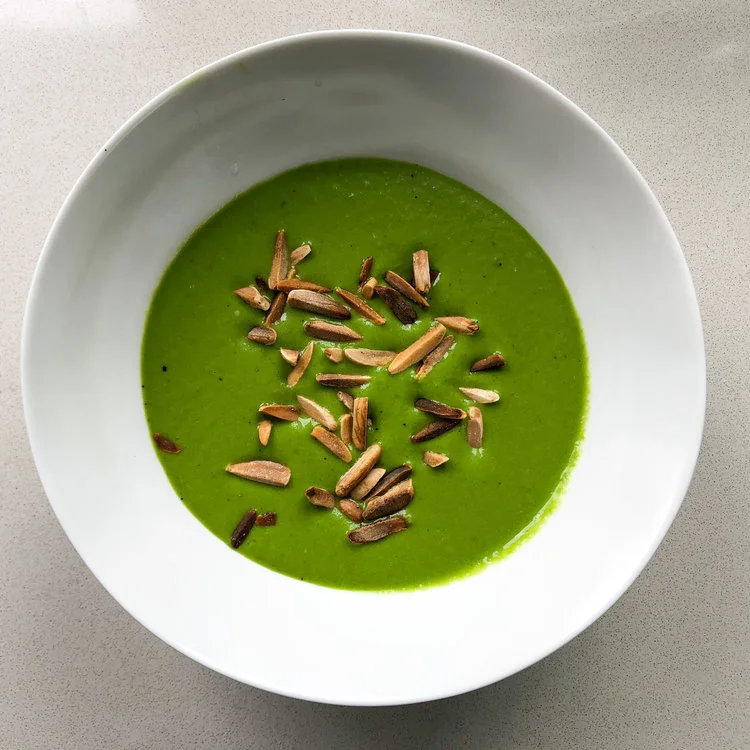
Green Gazpacho
Green is my favorite color; every shade and hue. It’s also my favorite color for vegetables-I love ALL the greens! As the heat continues on our beautiful island, I’ve taken advantage of the beautiful produce from our island farms, Moor’s End and Bartlett’s, and spun together this green gazpacho, which I serve alongside a delightfully delicious grilled cheese number (Pain D’Avignon French sandwich bread, arugula pesto, homemade aioli, aged Gouda, and farm tomatoes). The acidic, bright and chilly soup is a great foil to that umami bomb of a sandwich.
I don’t know how I’d be able to function without my trusty Vitamix. I’ve become so reliant on it for so many things, especially quick soups. This one is easy, beautiful and delicious. If you have a spare 20 minutes, get yourself moving and make some. Fancy it up in a special bowl or drink it from an old jelly jar, and then tell me how you liked it.

Serves 6
Ingredients
1 bunch of scallions, roughly chopped
1 green pepper, roughly chopped
1 large English cucumber, peeled, seeded and roughly chopped
1 clove garlic clove
1 t cumin
1 t smoked paprika
1/2 t salt
1 C Chicken or Vegetable Stock or Water
3 big handfuls of watercress, spinach, or arugula (or a combo)
1/2 bunch of parsley, minced
4 tablespoons olive oil
2 tablespoons sherry vinegar
Either Greek yogurt to swirl or toasted pumpkin seeds to sprinkle on top
Method
Combine the first seven ingredients in a strong blender. Pulse a bunch of times until everything is smooth. Add about a cup of water or stock and pulse again a few times.
Add the greens, parsley, olive oil and vinegar. Blend until smooth and thin a bit if necessary. Taste for salt and refrigerate until chilled (or pour into a bowl within a bowl of ice cubes to speed up the process.
Refrigerate until very cold.
Serve and swirl with yogurt, or sprinkle with seeds, or go crazy and do both!
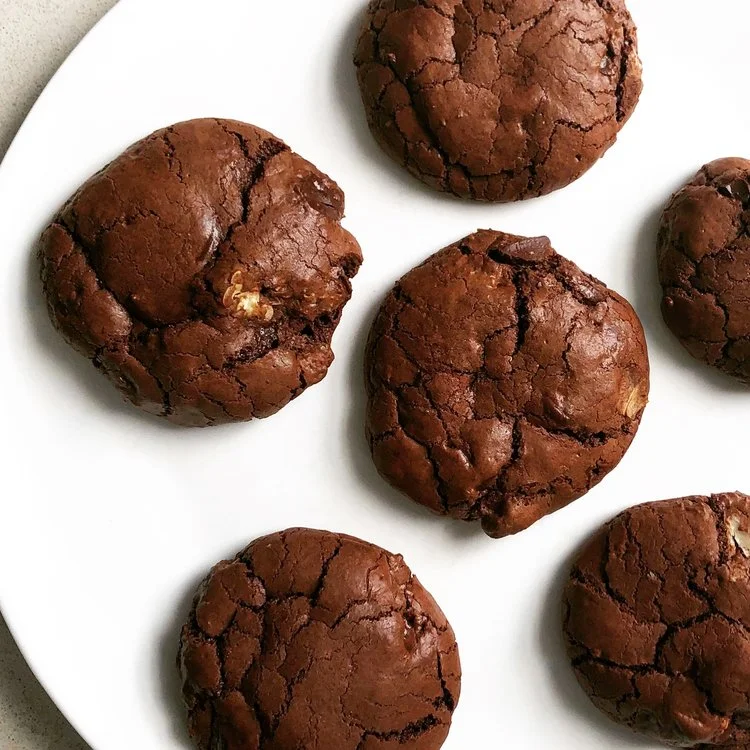
A chocolate cookie to end all cookies...
When the foodie internet was still youngish, I started following some of the pioneering food bloggers, dreaming that one day I too would be part of their special kids club. Well, work, motherhood, wifehood, life and all the rest of it gave me so many excuses not to find the time. I’m now trying to make up for that!
One of my favorite bloggers from the olden days is Clotilde Dusoulier, who does the impeccable Chocolate and Zucchini blog out of Paris. Her recipes (many of which are gluten free and vegetable forward) are among my favorites. This cookie recipe is all hers and I absolutely love it, so much that I never tweaked it one little bit! It’s a perfect recipe in that it is simple to prepare, easy to freeze and bake later, and can be eaten many ways (warm and gooey, cold and chewy, as a vehicle for carrying salty caramel ice cream to your pie hole...).

Here is how it goes:
Pecan Mudslides (from Chocolate and Zucchini)
Ingredients
15 ounces of good bittersweet chocolate chips (Guittard Extra Dark 63%)
1/2 cup toasted pecan halves
2/3 cup sugar
2 1/2 tablespoons unsalted butter, softened
2 eggs, room temperature
1/2 cup gluten free flour (I am a fan of Cup 4 Cup)
1 teaspoon baking powder
- ½ teaspoon sea salt
Method
Makes 16 substantial cookies
Line a 9 inch square baking dish with 2 pieces of parchment that hang over the edges and act as handles when you grab them. Spray with a good nonstick cooking spray.
Reserve around 6 ounces of the chocolate and set aside in a bowl with the pecan halves.
Melt the remaining chocolate in a heatproof bowl set over a pan of simmering water, stirring regularly until smooth. Set aside to cool slightly.
Cream together the sugar and butter until fluffy. Add the eggs one at a time, mixing well after each addition.
Combine the flour, baking powder, and salt in a bowl, then add that to the previous batter, mixing until just combined.
Add the melted chocolate, mix until just combined, then add the reserved chocolate and pecans and stir them in.
Pour the mixture into the prepared baking dish and spread it into an even-ish layer with a spatula. Place in the fridge for 20 minutes.
Preheat the oven to 375°F and line a baking sheet with parchment paper.
Remove the dough from the fridge and cut the dough into 16 pieces.
Roll each piece into a ball and place on the tray.
(If you want to freeze some to bake later, stick them in the freezer now until solid, then transfer to a ziplock bag or container. Bake without thawing.)
Bake for 15 minutes (16 if they were frozen), until the surface is just set, but still soft when gently pressed in the middle. Let the cookies settle on the baking sheet for 20 minutes before transferring them to a rack to cool completely.
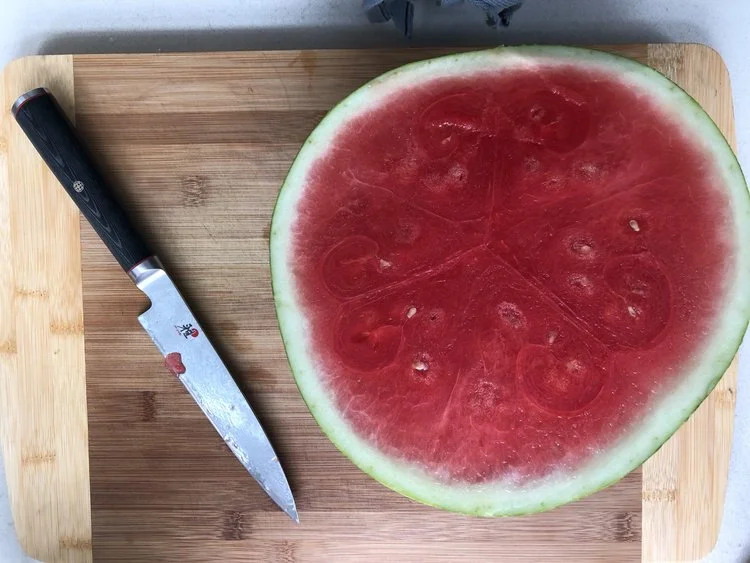
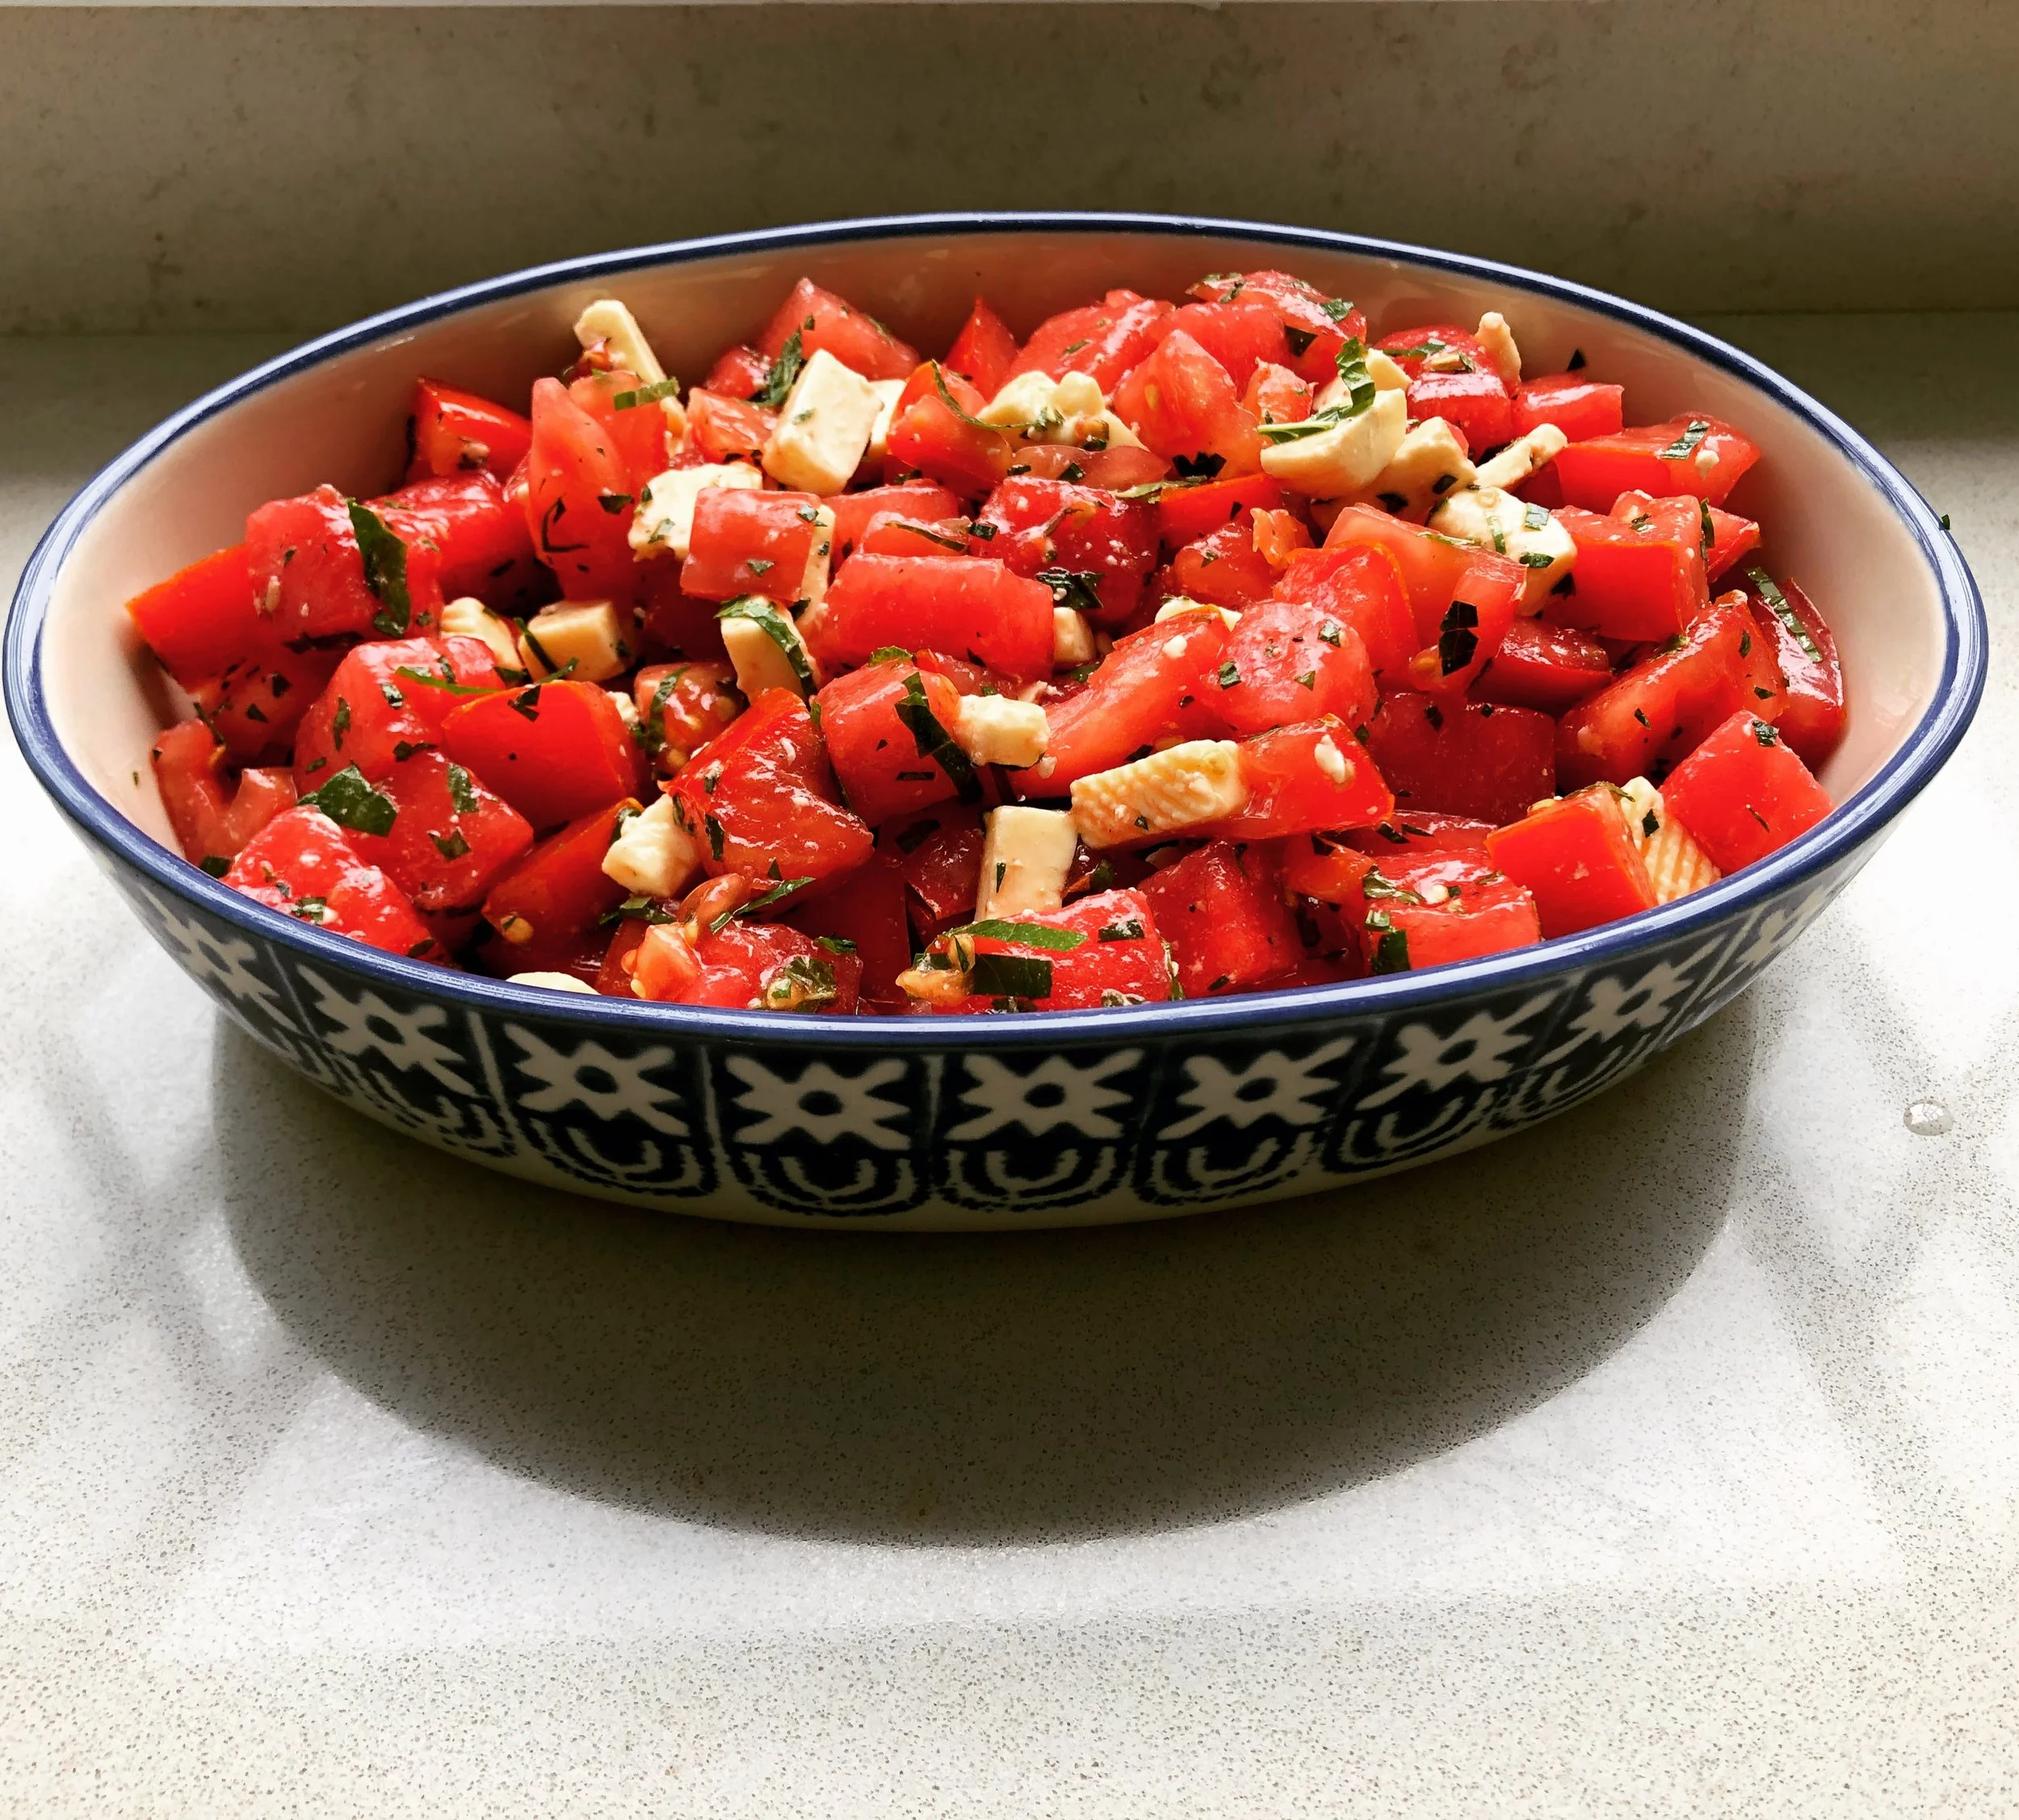
New Tricks and Watermelon Tomato Salad
In the last year, I’ve become a great fan of the Instagram. At the urging of the young people in my life, I signed up around this time last year and have really grown to love the platform for sharing and showcasing my food and travels. Today, I took a plunge and signed up to do that magical trick, where it says “Link to recipe in profile” (you know what I’m talking about!). This will be my first post using that magic!

First step is a perfect watermelon!
Nantucket is known for her cool ocean breezes and beautiful summer weather (yes, she is a she!). As someone who grew up here, I’ll tell you that many summer days can also be chilly, windy, foggy, wet, grey and occasionally hot and muggy. Yes, muggy. That’s where we were at last week, when I decided to take the ubiquitous watermelon/tomato salad route for my client.
it felt like I was traveling back to 1998, making this little number, but the tomatoes at Bartlett’s Farm are beauteous, although still grown in their hothouses, due to the crappy winter and spring we had here. Watermelon must be seedless! The feta should be the best you can afford (I love the one from Cricket Creek Farm) and the mint is mintier when freshly picked out of a garden.

The Mise en Place is on point here...
This salad is all about the dice (small and uniform), the vinegar (something with a little depth), and the temperature (chilly!). I’m trying to get better at this recipe writing stuff, so here it goes...
Ingredients
For this dish which fed 4-6 people happily, I used:
3 cups of diced tomatoes (about 3 medium-sized)
3 cups of diced seedless watermelon
1 1/2 cups of diced feta
2 Tablespoons of good, aged Sherry Vinegar
2 big handfuls of chopped mint (chocolate mint took over my garden this year and it worked beautifully!)
A splash of olive oil to finish
salt and pepper to taste, and I’m serious about that taste part! The feta could make your salad salty enough or it could use more. Get a spoon and find out before you feed your tribe!
Method
Toss the fruits, splash with vinegar, and chill for an hour. If too much juice has accumulated, strain it out and save it for a delightfully fruity salad dressing. Add the feta and mint and toss gently. Do your tasting and add a little salt if necessary. A quick grind of pepper and a splash of your best olive oil to finish. Serve it in the prettiest bowl you can find-the salad’s colors deserve it.