
Roasted Whole Cauliflower with Romesco
By now, most cooks I know are over the whole cauliflower craze and that includes the one where you roast the cauliflower whole. I am not over it. I fucking love cauliflower in any shape or form, but by far the best shape and form is beautiful, perfectly bronzed, tender, majestic and roasted whole. This delicious vegetable may be gilded further by placing it in a generous pool of Romesco, another trendy sauce that I have not tired of yet. Both are super easy, particularly if you have a good blender or food processor to make the Romesco. I am also going to take this opportunity to pitch one of my favorite knives to you. It is perfect for getting the core out of the cauliflower, plus a million other tasks in the kitchen. It is cheap and easy to get (here on Amazon), and I know you will fall in love with it too: the bird’s beak paring knife!
There are a million recipes for both of these dishes and I am still going to share mine with you. What I will tell you is that the last time I made this combo, I used a jar of piquillo peppers that I had hanging around and it elevated the Romesco to new heights. I loved this brand and it was perfect-not too spicy, deep pepper flavor and the most beauteous dark red color. I highly recommend subbing them in for regular roasted red peppers. If you get your cauliflower in the oven and make the sauce while it is cooking, this is a pretty hands-free situation. It is also gluten free, vegan and absolutely impressive to serve your friends and family. Cauliflower is perfection at this very moment, so run to the farmer’s market, get some and make this today!

Roasted Whole Cauliflower with Romesco
Serves a few hungry people as a side dish or two as a main course
Ingredients
1 large, perfect, beautiful cauliflower
Some decent cooking EVOO
Salt and pepper
2 cloves of garlic
3/4 cup of almonds, toasted
A large handful of parsley
1 14 ounce jar of Piquillo peppers, drained (I like this one)
1/4 cup tomato paste
3 tablespoons of GOOD sherry vinegar (I like this one)
2 teaspoons of smoked paprika
1/2 cup good EVOO
*cayenne-if you like spicy, add a 1/2 teaspoon, otherwise not necessary
Salt and pepper
Another handful of flat parsley leaves, casually torn
Method
Heat your oven to 400°. Carefully cut the core of your cauliflower out from the bottom (using your fabulous new bird’s beak knife) trying not to separate any florets from the stalk. Don’t overly worry if you do-you will get the hang of it in time. Place your cauliflower on a baking tray and drizzle olive oil over it-maybe 1/4-1/2 of a cup, depending on the size. Rub it all over so it is thoroughly greased up. Cover with foil and place in the oven. Bake for 30 minutes or so and then remove the foil, turn the heat down to 375 and continue to bake for about another hour or hour and a half. You are looking for burnished brown and tender throughout (use a cake tester, skewer, or toothpick to check).
While your beauty is in the oven, get out your blender, processor, or super sharp knife and bowl if you have neither (I am actually more of a processor fan for this task). Toss the first three ingredients into the machine and blitz till pasty. Add the peppers, tomato paste, vinegar, and paprika and blitz again till puréed. Slowly pour in the EVOO with the machine running and taste. Add salt, pepper, and (maybe) cayenne to your liking. If doing by hand, basically chop the hell out of everything and mix in the EVOO at the end. Or use a mortar and pestle and mash everything similarly. It will all taste delicious any way you do it.
When your cauliflower is finished, cut it into big meaty slices, and place it on a platter, which you have previously smeared great quantities of your gorgeous Romesco. Toss a great handful of the torn parsley leaves on top and proudly serve to your loved ones.

Ubiquitous Butternut Squash Soup
It was a little exciting and a little sad today, when I went by Bartlett’s and saw their radish/carrot/beet display changed out to their fall/winter squash extravaganza. I’m sure many cooks out there are still finding new and brilliant ways to impress their eaters with corn, tomatoes and zucchini. I for one, am a little tired and saturated with summer foods.
I haven’t been a private chef for that long (heading into 10 years, which now that I say it, sounds acceptably long!), but I do know that the pressures of coming up with delicious, new and exciting food can get challenging right before the change of season. I breathed a small sigh of relief as I saw the evidence of our gradual move into fall, all those yellows, burnt oranges and deep greens. My knee jerk response to seeing that beauteous pile of squash was of course, SOUP!
With a recipe like this one, I always wonder, doesn't everyone in the world know how to make this soup? I will tell you a truth I’ve learned over the years and that is NO! Many people don’t even know how to start making a soup from the bones. So, I try to keep my thoughts in a positive spin and assume that even if you have a tried and true Butternut Squash recipe, maybe yours is very different from mine. Or maybe yours uses dairy and you’d like a vegan version, or your spices differ from mine, or perhaps you’re looking for a new swirl-in topping to jazz yours up…Who knows?
As with all food instructions that I am most passionate about, this is another blueprint for ANY kind of winter squash soup, with ANY stock you like, ANY fruit variety you’d like to try out, and ANY allium you may have hanging about in the pantry. Same goes for the fat used to cook the allium, and spices are also completely up to you! The one tool that will change your soup game for the better (or best) is a Vitamix. I tried using the hand blender yesterday and gave up quickly. So worth spending a little $ on a powerful blender if you spend a lot of time in the kitchen. The link provided takes you to the certified refurbished models, which are cheaper and still under warranty. I’ve had mine for seven years now (knocks wood)!
Creamy Butternut Squash Soup with Arugula Pesto
Serves 4
Soup Ingredients
1 tablespoon of unsalted butter
1 tablespoon of yellow (canola variety) oil 1/2 medium sweet onion (like Vidalia), diced
3 cloves of garlic, minced
1 teaspoon of ground cumin
1/2 teaspoon of ground coriander
1 teaspoon of ground ginger
1 big pinch each of ground allspice and nutmeg (freshly grated, if possible)
1 medium butternut squash, peeled, seeded and cut into 1 inch chunks
1 apple, on the less-sweet side (think Granny Smith), peeled, cored and diced
3 cups of the stock/broth of your choice (or water!)
salt and pepper to taste
Pesto Ingredients
2-3 whole, peeled cloves of garlic
2 tablespoons of toasted nuts (I used slivered almonds today)
1/2 teaspoon of kosher salt
3-4 cups of arugula (for this purpose, it’s okay if it’s a little past it’s peak!)
1/2 cup or so of EVOO
Soup Method
In a nice large saucepan, heat the butter and oil over medium/low heat. Add the onions and stir for a couple of minutes, not letting them brown. We are thinking soft and translucent here. Add the garlic and spices and stir for another minute. Throw in the butternut squash and apple and stir for another few minutes. Pour in the broth, crank the heat and wait for the soup to boil. Once boiling, turn the heat down to simmer and cover the pot. Leave for about 20 minutes or so and test the squash-you want it nice and soft. Dump the contents of your pot carefully into the Vitamix container (I do this in the sink to avoid splashing and burning). Start low and end on high speed until you have a lovely and silky puree. Return to the pot, taste for salt and pepper and keep warm.
While the soup is cooking, blitz up the pesto in the Vitamix, food processor, or mortar and pestle (more of a grind than blitz!). Or chop everything up very finely for a more rustic approach. Start by grinding up the nuts, garlic and salt. Add the arugula and pulse a few times. Then add the EVOO until the consistency is nice and creamy. *Save and use on pasta, rice, grilled or roasted veggies or smear on your next grilled cheese sandwich for a hidden treat!*
Serve your beautiful soup (vegan or not, depending on your broth and fat choices) with the pesto swirled decoratively on top. You can also add some toasted nuts, seeds or croutons for crunch if you like.
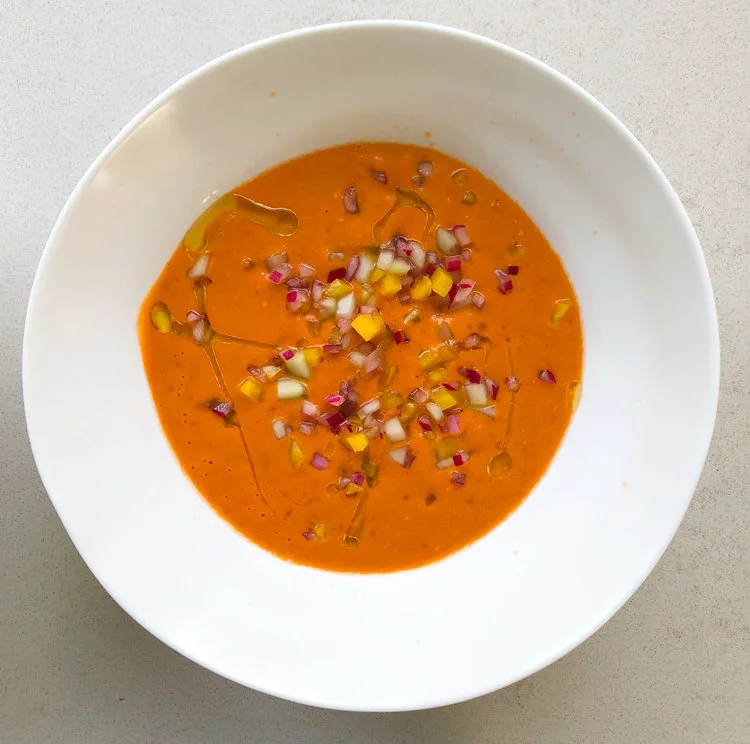
Beautiful and Delicious Gazpacho
Okay, I gave you a green Gazpacho a few weeks ago. Now, I hand you the red. This is the thing though, I make this exclusively with a Vitamix and really believe the results have something to do with the power of that machine. I have not tried this in a regular blender, but I think you should and just cut everything up a little smaller and maybe give it a little more time to blend for the best consistency. It is important to have a couple of key ingredients for this mostly flexible recipe.Good Sherry Vinegar and smoked Paprika are what I believe set it apart from mediocre to fabulous. Those two pantry items will not sit idle in your kitchen-you will get plenty of other use for them (to begin with, substituting them for other vinegars and regular paprika in your own recipes). Don’t go cheap here, please!

I like Gazpacho in all shapes and forms. The rustic stuff with big chunks of vegetables and lots of garlic is great. So is a more refined version I’ve had that was satiny smooth with no veggie pieces at all and just some jagged and delicious croutons for crunch. I am falling right into the middle with this super quick and easy recipe. First, you are going to blend the hell out of a few ingredients to get a creamy base, and then you are going to spend a few quality minutes with your very sharp knife and cutting board, finely dicing some veggies for texture. You can scatter these on top (like I did for the fancy photo), or mix them in and pour into a to-go cup for a quick and refreshing lunch. Croutons are up to you. I don’t tend to go for them here, but you can make something crispy and garlicky if you desire. I love drizzling a homemade herb oil on top (see below).
The best part of this whole cooking experience is NOT TURNING ON THE STOVE! Yay! Oh yeah, and it’s also beautiful and delicious!
Plain and Simple Delicious Gazpacho
Ingredients
1 small red onion, cut into 2 halves
1/4 cup of good sherry vinegar
2 medium cloves of garlic, smashed with a few pinches of salt, under the blade of your knife
1 large slice of white bread (gluten free or with gluten-no matter)
Around 5-6large farm tomatoes, cored and coarsely chopped (don’t worry about blemishes)
1 medium cucumber, peeled and seeded and cut into 2 halves
1 medium pepper (green or any other color will do if you can’t stand green), seeded and cored and cut into 2 halves
1 teaspoon of Kosher salt (or whatever salt you love)
2 teaspoons of smoked paprika
1/2 -3/4cup of EVOO
Optional, Basil or Parsley or Chives-Or no herbs at all! (I almost never use them), Croutons, any homemade herb oil for serving (blend a few handfuls of a fresh herb with 1/2 cup of EVOO and strain)
Method
Take one of the halves of the red onion and dice finely as you are able. Put in a small bowl and cover with the vinegar and let sit for 10-15 minutes. Get out the jug of your blender or Vitamix and toss in the garlic, bread, tomatoes, one of the halves of the of the cucumber and pepper (only roughly chop if using a regular blender), salt and paprika. When the onion has soaked, strain the vinegar into the blender, reserving the diced onion. Place the lid on and let her rip! I go to about medium speed on the Vitamix and that’s plenty. After a minute or two, pour in the olive oil through the top hole in the lid. Blend another 30 seconds and refrigerate immediately.
Take the other two veggie halves (cucumber and pepper) and dice as finely as the reserved red onion. Throw them in the same bowl and refrigerate too. You can eat this as soon as you like, really, but it’s best chilled for at least an hour and as long as overnight. Serve with a good handful of the diced veggies and a drizzle of your herb oil (if you have it). Serve it in cups, bowls, jelly jars, to-go mugs…

A Throwback Goat Cheese Salad
There are a few things about this salad that scream “trendy foods of the past!” and there is also a classic element, hailing from bistros in France. Trends include the 1980’s American foodie tendency to fry goat cheese and put it in a salad (which is also the classic element, as we totally stole the idea from the French). Also, beets and cheese in salads came into popularity in the 80’s. Honestly I’m glad they did, because I adore the combination. And folks, two words: fried cheese.
A few imperatives for this simple recipe.
Get good goat cheese, season it, and chill the patties for at least 15 minutes before cooking.
Try to get the best lettuces you can, as they are the biggest player here. A mix of textures and colors work beautifully. I really prefer adult-sized leaves for this, but if you can only find young mixed greens, then go for it.
Invest in one great bottle of olive oil that you use only for salads.
Find a brand of champagne vinegar that you like and always have it on hand.

With a little forethought and a few good pantry ingredients on hand, you can have what I consider to be a perfect lunch. And I am totally gifting you my best salad dressing recipe. So, you’re welcome. Please make this salad at least once and let me know what you think!
Salad Greens and Beets with Crusty warm Goat Cheeses
Serves 2
Ingredients
4 heaping tablespoons of a fresh, soft goat cheese made from happy goats
1/4 teaspoon of salt and a grind of pepper
1 tablespoon of minced chives
1 small minced clove of garlic
1 egg, beaten with a spoonful of water, or a beaten egg white
1 cup of seasoned breadcrumbs in a shallow dish (panko, fresh homemade, or gluten free-I think panko has the best texture)
2 tablespoons of ghee, canola or olive oil
4-5 cups of washed mixed lettuces.
About a cup of your favorite beets, cooked in boiling salted water, skins on, until tender. Cooled and sliced in whatever way you think is most beautiful.
A small handful of chopped, toasted nuts if you like (I had some leftover walnuts)
Dressing
1 generous tablespoon of very finely minced shallots soaked in
1/4 cup of good champagne vinegar
1 teaspoon of Dijon mustard (creamy)
1 teaspoon of mild honey (or agave or sugar)
Salt and pepper
1/2 cup of good EVOO (approximately)
Method
Get a fork and a small bowl and mix the goat cheese with the seasonings. Have a small dish lined with wax or parchment paper ready. Quickly form into four small patties and dip into the egg and then panko. Place on the prepared plate and stick in the fridge for a MINIMUM of 15 minutes, better yet, an hour (sorry for yelling).
Wash and dry your lovely lettuces and make the dressing by whisking everything in a bowl till creamy.
Heat a small non-stick frying pan on medium/low for a couple of minutes. Add the fat and wait a minute. Get your chilled patties and place carefully into the hot fat and cook until each side is golden brown.
Dress the salad leaves and beets and compose in your favorite bowl. Add the goat cheeses and serve with a little more dressing on the side while the cheese is still warm.

A Lovely Tomato and Goat Cheese Tart
Nantucket isn’t called the Grey Lady for nothing. On the loveliest of days, all of the houses are grey shingled and depending on the season, the landscape is quite grey as well. Add fog to the mix and you end up with a palette of palest silver to deep charcoal. For this reason, on grey August day #3, it was imperative that I find the best and brightest colors to bring to the table.

Happily, Bartlett’s Farm has a decent selection of heirloom tomatoes at the moment and so I decided to do the easiest and classiest thing and make an heirloom tomato, herb, and goat cheese tart. This falls right into my sweet spot-beautiful, delicious, seasonal, flexible, and impressive. I will tell you immediately that I already had a Dufour Puff Pastry in the freezer when I made this decision. That is the only part of the recipe I am going to be inflexible about (besides the part where you have the best tomatoes ever). Use a puff pastry that is made with real butter! That said, you can add all kinds of other embellishments, or none at all, and make it with only tomatoes, goat cheese (I am in love with this brand), and herbs. Your choice!

Look at those beauties!
I happened to have a few spoonfuls of grated parmesan, a tiny bowl of leftover arugula pesto (see the previous post about squash soup), a jar of tomato jam and a lovely few sprigs of fresh thyme. So those were my embellishments. Do what you like. Buy a container of pesto and use that, make a paste of parsley and chives from the garden and use it. Do you have a small hard piece of gruyere or cheddar that you will eventually toss out? Give it a new life and incorporate it into the recipe. Go wild!
Here’s how.
Summer Tomato and Goat Cheese Tart
Ingredients
1//2 of a Dufour Puff Pastry sheet, defrosted in the fridge for 3 hours
1 tablespoon of pesto (or none at all)
2 tablespoons of grated parmesan or pecorino ( or any other kind of cheese, or none at all)
3-5 beautiful and perfect tomatoes, sliced into about 1/4 inch rounds and laid out to drain a bit on paper towels
1 tablespoon of tomato jam, melted over a low heat (or hot pepper jelly, or none at all)
Around 3 tablespoons of very good goat cheese
1 tablespoon of chopped fresh thyme (or basil, or 1 teaspoon of fresh rosemary, or parsley…or none at all)
Salt and pepper
1 teaspoon of good EVOO
Method
Preheat the oven to 400° and set a rack right into the middle space. Line a 1/4 sheet pan (or larger sheet pan or cookie tray) with parchment paper. Carefully place the rectangular half of the pastry onto the parchment. If using, gently spread the pesto over the pastry, leaving 1/2 inch of border around the edges empty. If using, sprinkle the cheese over the pesto. Lay your beauteous tomatoes atop the pesto/cheese (or empty pastry) in any lovely pattern you like, leaving the border free. If you like and have it on hand, brush the melted tomato jam over the tomatoes. Crumble the goat cheese decoratively over that and sprinkle with thyme. Salt cautiously and wave the pepper mill over the whole thing. Right before sticking it in the oven, dribble the oil over your gorgeous masterpiece. Bake for about 20-30 minutes, depending on your oven, until the pastry is a deep golden brown and the borders are puffed. You want it to get as crispy as possible without looking burned. Serve hot, warm or room temperature and impress yourself or some lucky friends and family.

A Simple Summer Squash Soup
Well I guess if you complain enough, the hot weather eventually will become cold and grey, with a bitey north wind and spit-in-your-face precipitation. Lovely Nantucket!
On a positive note, the cool day gave me a chance to cook food and actually serve it hot. Yay! Best rainy day menu? Soup and a sandwich (okay, there was also a salad, because August-you know?). I looked around at Moor’s End Farm, took stock, and decided the soup would be summer squash and carrot, embellished with arugula pesto. The accompanying sandwich had to be Ruth Reichl’s infamous grilled cheese (don’t ask questions, just click on that link and make it as fast as you are able).

This technique is pretty standard. I could have used any allium or squash varieties for the soup. And the pesto variations are endless! (I’ll tell you all about pesto another day). The idea here again, is to not get wound up about having the exact variety of something. Try to roll with a growth type mindset as opposed to the fixed variety (that’s an education thing, kids).
In the meantime, try this soup on for size and let me know how it works for you.

Any Squash, Flexible-Mindset Soup
Serves 4
Ingredients
2 T ghee (or butter, or EVOO, or canola...)
1 leek (white to palest green part only), minced super finely (look on YouTube if you haven’t minced a leek before). Or use any other kind of onion you have on hand!
2 cloves of garlic, smashed, pressed, minced or grated
2 teaspoons of dried thyme (or 2 tablespoons fresh if you like)
3 medium carrots, scrubbed and roughly chopped (peel if you feel a desperate need)
1/2 a russet potato, peeled and chopped
3 cups of stock-I used chicken, but any kind will do. Or water!
1 bay leaf
3 small summer squash (or zucchini or patty pan...), roughly chopped (about 2+ cups)
1 cup of some sort of milk-dairy, soy, nut, coconut (I actually used cream, because I had some that needed to be finished)
Salt and pepper to taste
A few pinches of nutmeg (freshly grated is best)
Arugula Pesto (to finish)
1 clove garlic
1 tablespoon of nuts (I used toasted slivered almonds)
1/2-1 cup of arugula
1/2 cup EVOO
Salt to taste (about 1/4 teaspoon)
Method
Heat the fat at medium-low in a large skillet that has a lid (if no lid, a large sheet pan will suffice). Sauté the leeks for a few minutes, stirring, until soft. Add the garlic next, stirring still for just a minute, and then the thyme for another few seconds. Throw in the carrots, potato, bay leaf and stock, and crank the heat till it boils. Cover, turn down to lowish heat so the moisture simmers enthusiastically, and cook until the root vegetables are tender. Add the squash, cover again and leave till cooked through. Probably another 10-15 minutes.
While the soup is cooking, quickly whip up the pesto, either by using your fabulous knife skills and muscle, a mortar and pestle, or a food processor. The idea is to first chop/mash/pulverize the garlic and nuts together into a paste. Then stir/mash/add in the very finely minced arugula and salt. Pour in the oil last, stir to mix, and salt to taste. Set aside.
After the squash is tender but not mushy, remove the bay leaf, add the milk and carefully purée the mixture, either using an immersion blender, Vitamix, or regular blender. Taste for salt and give a grind of pepper. If it’s still hot, serve right away. If not, transfer it to a saucepan and keep warm over a very low heat. Serve with the arugula pesto, dolloped on top prettily.
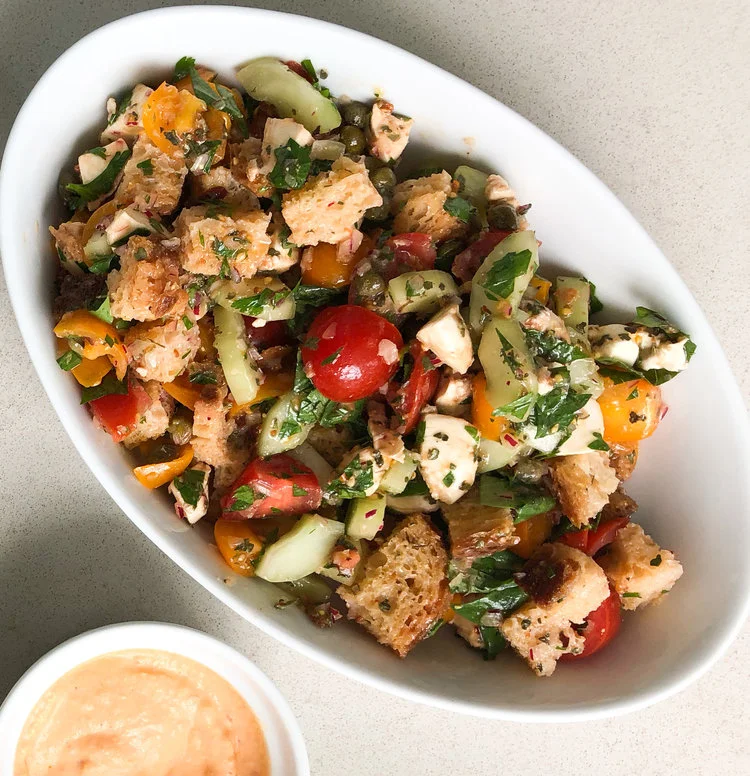
Panzanella Salad
I simply love a dish that is not only beautiful, delicious, and flexible, but that also uses food that might otherwise be thought of as past it’s prime. Consider the lovely and frugal Panzanella Salad. She will gladly showcase your stale bread and wilty herbs, and you could even oven roast a subpar tomato for this one if necessary. The only ingredients that must be excellent are the mozzarella and olive oil. Really! And did I mention you don’t need to turn on the stove? Get on it while the tomatoes are still at your farmer’s market!

Panzanella Salad
Feeds about 2-4
Ingredients
2 Big slices of good, stale country type bread, cut or torn into bite sized pieces (you can also dry your bread out in the oven, but that means turning your stove on!)
2 cups of tomatoes of all types, cut to a similar size as the bread
6-8 small mozzarella balls (bocconcini) , sliced into rounds
1/2 cup finely diced onion (red or white) covered in red wine vinegar to soak for 10-15 minutes
1 cup of peeled and seeded cucumber, cut into small half rounds
1 clove garlic, grated, minced or smashed
1 teaspoon Dijon mustard
1 teaspoon dried oregano
1/2 cup EVOO (your very best!)
1/2 cup chopped fresh parsley
1/2 cup chopped fresh basil
salt and pepper to taste
Method
In a large bowl, toss together the bread, tomatoes, and mozzarella. Drain the onion, reserving the vinegar, and add that to the mixture. Now, either using a whisk and bowl, or handy small food processor type machine, make the dressing, using the garlic, mustard, oregano, 1/4 cup of reserved vinegar, and EVOO. Mix the dressing into the salad (I use my hands and will say this is the best way to toss and dress every salad!). Add the remaining ingredients and let it sit for at least 15-20 minutes. If it’s hot as hell outside, I sometimes even chill this for an hour (a crime in some peoples books). Serve it on a bed of greens if you like.
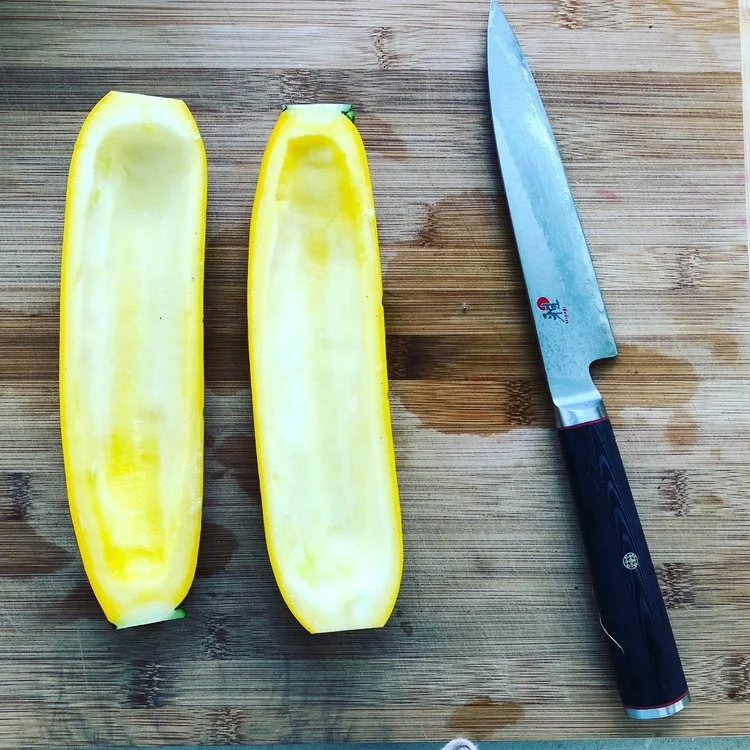
Stuff a zucchini!
Have you ever opened the door to leave your house and been surprised by a mysterious bag of zucchinis? Well, I have. It’s a great trick that folks with prolific gardens like to play, and some of those suckers are as big as a Louisville slugger! My grandmother did this occasionally, and once we received an anonymous bluefish in return! She laughed her head off and went on to fillet that bad boy and make her famous Blunafish Salad for lunch...
We all have our go-to summer squash recipes. A few of mine include gratins, fritters, a raw salad made with zoodles (man, I hate that word!), and a new-to-me dish by Ottolenghi that I absolutely adore. By late August, you’d think I’d have had enough, but yesterday I grabbed a bright yellow zucchini, the kind with slightly tougher skin, and decided it needed stuffing.

Stuffing is awesome, because the ingredients can be whatever you’re feeling that day. Yesterday I was all about using the Italian chicken sausage with kale that was in the freezer. Tomorrow it could be an all-mushroom affair. The next day, maybe crabmeat. Again, the alliums can be whatever you have or prefer, leave out the pepper if you don’t have one (or use the awesome roasted ones from a jar that I love so very much), do homemade, gluten free or Japanese breadcrumbs...The choices are all yours! Yay!

So, go now and look in the fridge to see what you’ve got, and follow these basic steps.
Stuffed Zucchini
Serves 2 as a main with a few salady sides (double or triple if you have a crowd!)
Ingredients
1 beautiful medium zucchini, or any other summer squash that you have. I used one that was around 8 inches long
1 teaspoon of Kosher salt
1 tablespoon of ghee, EVOO, butter, or light oil
1 cup of any fresh mushroom, minced finely
A splash of leftover white wine (like 1/4 cup at the most)
1 medium shallot or other allium, minced (about 1-2 tablespoons)
1 tablespoon of minced red, yellow, or orange pepper
1 clove of garlic, minced
1 large link of sausage (your choice), out of the casing
1 teaspoon of anchovy paste
1 teaspoon of red wine vinegar
1/2 cup of panko (I used GF)
1/4 cup of Parmesan (or some other cheese that you like)
A handful of minced parsley and any other herb you love. I also used a little thyme in this one.
Method
Preheat the oven to 350° (I used the convection bake setting). Cut the ends off of the squash, leaving a tiny bit of the stem. Use a teaspoon to scrape out the seeds, leaving enough flesh for a sturdy structure. Slice the thinnest, tiniest piece from the bottom of your boat, so that it will sit upright without tipping over. Save about 2 tablespoons of the flesh and chop it up. Salt the inside of your boat with the salt and turn upside down on a kitchen or paper towel for about 10 minutes, and then pat dry.
Heat the fat over a medium heat in a medium skillet, add the mushrooms and stir until they lose their liquid and start to brown a little. Throw in the splash of wine and let it cook down. Add the shallot, minced red pepper, and garlic and stir for a minute to soften. Crumble in the sausage, breaking it up with a wooden spoon into very small pieces. Sauté until it’s just cooked through and scrape everything into a bowl. Stir in the anchovy paste and vinegar and taste for salt and give a grind of pepper. When you are ready to bake, gently fold in the panko, cheese and herbs. Place on an oiled sheet pan and drizzle the top with a tiny bit of EVOO.
Bake for around 20-25 minutes, until browned and heated through. Serve hot or at room temperature. They reheat well too.