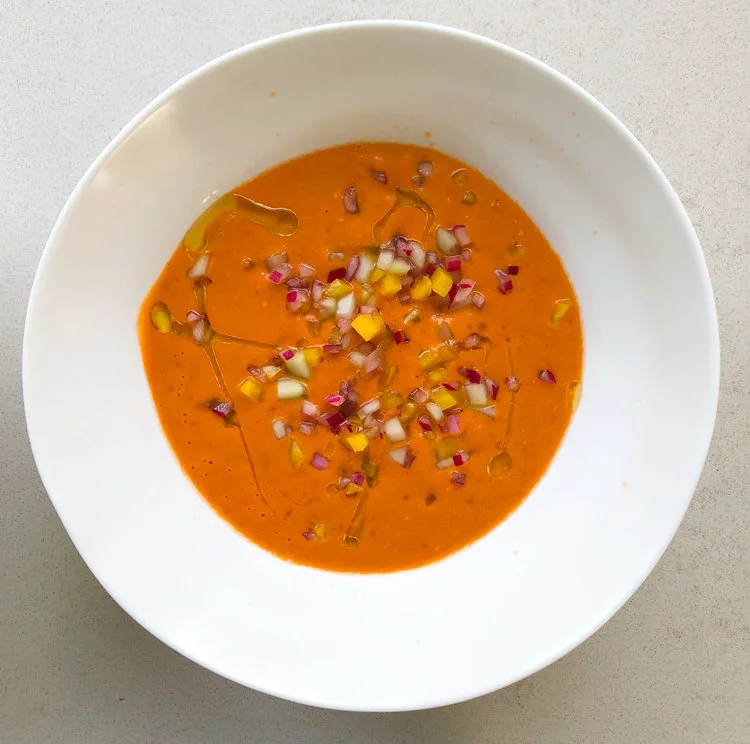
Beautiful and Delicious Gazpacho
Okay, I gave you a green Gazpacho a few weeks ago. Now, I hand you the red. This is the thing though, I make this exclusively with a Vitamix and really believe the results have something to do with the power of that machine. I have not tried this in a regular blender, but I think you should and just cut everything up a little smaller and maybe give it a little more time to blend for the best consistency. It is important to have a couple of key ingredients for this mostly flexible recipe.Good Sherry Vinegar and smoked Paprika are what I believe set it apart from mediocre to fabulous. Those two pantry items will not sit idle in your kitchen-you will get plenty of other use for them (to begin with, substituting them for other vinegars and regular paprika in your own recipes). Don’t go cheap here, please!

I like Gazpacho in all shapes and forms. The rustic stuff with big chunks of vegetables and lots of garlic is great. So is a more refined version I’ve had that was satiny smooth with no veggie pieces at all and just some jagged and delicious croutons for crunch. I am falling right into the middle with this super quick and easy recipe. First, you are going to blend the hell out of a few ingredients to get a creamy base, and then you are going to spend a few quality minutes with your very sharp knife and cutting board, finely dicing some veggies for texture. You can scatter these on top (like I did for the fancy photo), or mix them in and pour into a to-go cup for a quick and refreshing lunch. Croutons are up to you. I don’t tend to go for them here, but you can make something crispy and garlicky if you desire. I love drizzling a homemade herb oil on top (see below).
The best part of this whole cooking experience is NOT TURNING ON THE STOVE! Yay! Oh yeah, and it’s also beautiful and delicious!
Plain and Simple Delicious Gazpacho
Ingredients
1 small red onion, cut into 2 halves
1/4 cup of good sherry vinegar
2 medium cloves of garlic, smashed with a few pinches of salt, under the blade of your knife
1 large slice of white bread (gluten free or with gluten-no matter)
Around 5-6large farm tomatoes, cored and coarsely chopped (don’t worry about blemishes)
1 medium cucumber, peeled and seeded and cut into 2 halves
1 medium pepper (green or any other color will do if you can’t stand green), seeded and cored and cut into 2 halves
1 teaspoon of Kosher salt (or whatever salt you love)
2 teaspoons of smoked paprika
1/2 -3/4cup of EVOO
Optional, Basil or Parsley or Chives-Or no herbs at all! (I almost never use them), Croutons, any homemade herb oil for serving (blend a few handfuls of a fresh herb with 1/2 cup of EVOO and strain)
Method
Take one of the halves of the red onion and dice finely as you are able. Put in a small bowl and cover with the vinegar and let sit for 10-15 minutes. Get out the jug of your blender or Vitamix and toss in the garlic, bread, tomatoes, one of the halves of the of the cucumber and pepper (only roughly chop if using a regular blender), salt and paprika. When the onion has soaked, strain the vinegar into the blender, reserving the diced onion. Place the lid on and let her rip! I go to about medium speed on the Vitamix and that’s plenty. After a minute or two, pour in the olive oil through the top hole in the lid. Blend another 30 seconds and refrigerate immediately.
Take the other two veggie halves (cucumber and pepper) and dice as finely as the reserved red onion. Throw them in the same bowl and refrigerate too. You can eat this as soon as you like, really, but it’s best chilled for at least an hour and as long as overnight. Serve with a good handful of the diced veggies and a drizzle of your herb oil (if you have it). Serve it in cups, bowls, jelly jars, to-go mugs…

A Lovely Tomato and Goat Cheese Tart
Nantucket isn’t called the Grey Lady for nothing. On the loveliest of days, all of the houses are grey shingled and depending on the season, the landscape is quite grey as well. Add fog to the mix and you end up with a palette of palest silver to deep charcoal. For this reason, on grey August day #3, it was imperative that I find the best and brightest colors to bring to the table.

Happily, Bartlett’s Farm has a decent selection of heirloom tomatoes at the moment and so I decided to do the easiest and classiest thing and make an heirloom tomato, herb, and goat cheese tart. This falls right into my sweet spot-beautiful, delicious, seasonal, flexible, and impressive. I will tell you immediately that I already had a Dufour Puff Pastry in the freezer when I made this decision. That is the only part of the recipe I am going to be inflexible about (besides the part where you have the best tomatoes ever). Use a puff pastry that is made with real butter! That said, you can add all kinds of other embellishments, or none at all, and make it with only tomatoes, goat cheese (I am in love with this brand), and herbs. Your choice!

Look at those beauties!
I happened to have a few spoonfuls of grated parmesan, a tiny bowl of leftover arugula pesto (see the previous post about squash soup), a jar of tomato jam and a lovely few sprigs of fresh thyme. So those were my embellishments. Do what you like. Buy a container of pesto and use that, make a paste of parsley and chives from the garden and use it. Do you have a small hard piece of gruyere or cheddar that you will eventually toss out? Give it a new life and incorporate it into the recipe. Go wild!
Here’s how.
Summer Tomato and Goat Cheese Tart
Ingredients
1//2 of a Dufour Puff Pastry sheet, defrosted in the fridge for 3 hours
1 tablespoon of pesto (or none at all)
2 tablespoons of grated parmesan or pecorino ( or any other kind of cheese, or none at all)
3-5 beautiful and perfect tomatoes, sliced into about 1/4 inch rounds and laid out to drain a bit on paper towels
1 tablespoon of tomato jam, melted over a low heat (or hot pepper jelly, or none at all)
Around 3 tablespoons of very good goat cheese
1 tablespoon of chopped fresh thyme (or basil, or 1 teaspoon of fresh rosemary, or parsley…or none at all)
Salt and pepper
1 teaspoon of good EVOO
Method
Preheat the oven to 400° and set a rack right into the middle space. Line a 1/4 sheet pan (or larger sheet pan or cookie tray) with parchment paper. Carefully place the rectangular half of the pastry onto the parchment. If using, gently spread the pesto over the pastry, leaving 1/2 inch of border around the edges empty. If using, sprinkle the cheese over the pesto. Lay your beauteous tomatoes atop the pesto/cheese (or empty pastry) in any lovely pattern you like, leaving the border free. If you like and have it on hand, brush the melted tomato jam over the tomatoes. Crumble the goat cheese decoratively over that and sprinkle with thyme. Salt cautiously and wave the pepper mill over the whole thing. Right before sticking it in the oven, dribble the oil over your gorgeous masterpiece. Bake for about 20-30 minutes, depending on your oven, until the pastry is a deep golden brown and the borders are puffed. You want it to get as crispy as possible without looking burned. Serve hot, warm or room temperature and impress yourself or some lucky friends and family.

A Simple Summer Squash Soup
Well I guess if you complain enough, the hot weather eventually will become cold and grey, with a bitey north wind and spit-in-your-face precipitation. Lovely Nantucket!
On a positive note, the cool day gave me a chance to cook food and actually serve it hot. Yay! Best rainy day menu? Soup and a sandwich (okay, there was also a salad, because August-you know?). I looked around at Moor’s End Farm, took stock, and decided the soup would be summer squash and carrot, embellished with arugula pesto. The accompanying sandwich had to be Ruth Reichl’s infamous grilled cheese (don’t ask questions, just click on that link and make it as fast as you are able).

This technique is pretty standard. I could have used any allium or squash varieties for the soup. And the pesto variations are endless! (I’ll tell you all about pesto another day). The idea here again, is to not get wound up about having the exact variety of something. Try to roll with a growth type mindset as opposed to the fixed variety (that’s an education thing, kids).
In the meantime, try this soup on for size and let me know how it works for you.

Any Squash, Flexible-Mindset Soup
Serves 4
Ingredients
2 T ghee (or butter, or EVOO, or canola...)
1 leek (white to palest green part only), minced super finely (look on YouTube if you haven’t minced a leek before). Or use any other kind of onion you have on hand!
2 cloves of garlic, smashed, pressed, minced or grated
2 teaspoons of dried thyme (or 2 tablespoons fresh if you like)
3 medium carrots, scrubbed and roughly chopped (peel if you feel a desperate need)
1/2 a russet potato, peeled and chopped
3 cups of stock-I used chicken, but any kind will do. Or water!
1 bay leaf
3 small summer squash (or zucchini or patty pan...), roughly chopped (about 2+ cups)
1 cup of some sort of milk-dairy, soy, nut, coconut (I actually used cream, because I had some that needed to be finished)
Salt and pepper to taste
A few pinches of nutmeg (freshly grated is best)
Arugula Pesto (to finish)
1 clove garlic
1 tablespoon of nuts (I used toasted slivered almonds)
1/2-1 cup of arugula
1/2 cup EVOO
Salt to taste (about 1/4 teaspoon)
Method
Heat the fat at medium-low in a large skillet that has a lid (if no lid, a large sheet pan will suffice). Sauté the leeks for a few minutes, stirring, until soft. Add the garlic next, stirring still for just a minute, and then the thyme for another few seconds. Throw in the carrots, potato, bay leaf and stock, and crank the heat till it boils. Cover, turn down to lowish heat so the moisture simmers enthusiastically, and cook until the root vegetables are tender. Add the squash, cover again and leave till cooked through. Probably another 10-15 minutes.
While the soup is cooking, quickly whip up the pesto, either by using your fabulous knife skills and muscle, a mortar and pestle, or a food processor. The idea is to first chop/mash/pulverize the garlic and nuts together into a paste. Then stir/mash/add in the very finely minced arugula and salt. Pour in the oil last, stir to mix, and salt to taste. Set aside.
After the squash is tender but not mushy, remove the bay leaf, add the milk and carefully purée the mixture, either using an immersion blender, Vitamix, or regular blender. Taste for salt and give a grind of pepper. If it’s still hot, serve right away. If not, transfer it to a saucepan and keep warm over a very low heat. Serve with the arugula pesto, dolloped on top prettily.

A Lovely Asian Slaw
So many slaws! I already went on and on about this last week, so I will spare you the rant. Today I wanted to do creamy sesame noodles with crab cakes and needed something bright, colorful, acidic, and vegetable-forward to round out the lunch menu. This salad was the perfect choice. It would also be a great match for a marinated and grilled flank steak, teriyaki type chicken, or piece of miso marinated fish. So much versatility!

Before you start cooking though, I’m going to shamelessly plug for a tool that I think most cooks can afford and is indispensable if you love and work with vegetables regularly. It is the Benriner Mandoline Slicer and once you get into a routine of using it, you will never look back. It has three blades, two of which do more fancy shreddy type things. The flat blade is perfect for 99% of my needs. Think perfect potato slices for gratins, thinly shaved veggies for gorgeous salads, fine shredding for slaws, identically sized apple slices for tarts...you get the picture. It’s available for under $40 on Amazon and I tell everyone I know who loves cooking to get one.
One final note-every vegetable in this beautiful salad was available at the farm market today, so hooray for the farmers! Now, cook!
Asian Inspired Slaw
Serves 6
Ingredients
1 1/2 cups of Green Cabbage, sliced very thinly (use a mandoline if you have one)
1 1/2 cups of Purple Cabbage cut the same way as the green
1/2 cup thinly sliced red onion (mandoline) soaked in 2-3 tablespoons of rice vinegar for about 10 minutes
1/2 cup of thinly sliced red pepper (mandoline)
1/2 cup of shredded carrot (either use mandoline to get super thin slices and then cut into fine shreds with a knife, or use the coarse holes on a grater)
1/2 cup of shredded radish (approach the same as carrot)
1/2 cup minced cilantro
2 tablespoons minced chives
Juice and zest of 2 limes
2 tablespoons dark toasted sesame oil
2 tablespoons of peanut oil
1 tablespoon of honey
Sriracha and salt to taste
Method
Toss everything together and stick in the fridge to chill for at least 15 minutes. Taste for seasoning.

Curried Chicken Salad Circa 1986
I have a confession to make. I own more than 500 hundred print cookbooks. There wasn’t enough space in my home and so my husband built a special giant bookcase for all of them. It’s hard, because I love them all and I also need to downsize pretty soon. I have a dream of going through them all and photographing the best recipes for my collection in Evernote. This will clearly never happen. I want to keep like 50 of them...well, maybe 100 tops...and Time Life Foods of the World counts as one, right? Oy vey. Please send help!
A couple of my favorites were released in the 80’s. Martha Stewart’s first book, The Silver Palate, and an old fish cookbook by Jasper White that has a killer recipe for gravlax made with bluefish (yes!). Something most of the books from that particular era have in common is a love of adding curry to dishes that don’t typically ask for it. I guess it was a thing back then? Curried chicken salad was definitely THE thing in those days. I have a nostalgic memory of my grandmother making it and loving every bite, except the ones with raisins. Raisins are my nemesis. Always were and always have been.

My chicken salad has pretty standard ingredients, but there is one that is new to me this year and I LOVE it! It is a curry paste in a tube from a company called Entube and it is fiery, fresh, and delightfully authentic. They also make harissa, molé, and umeboshi pastes. I highly recommend their products and at the moment, you can grab a tube at Bartlett’s Farm if you’re on island. If not, the internet is your bff.
If you need yet another chicken salad recipe (or tofu, if you’re into that sort of thing), then look no further. And be careful with that curry paste-it’s hot af and you might want to supplement it with some milder powder to keep the heat down. Okay! Ready, set, go!
Curried Chicken Salad
Ingredients
1 whole roasted chicken, torn and/or cut up into bite sized pieces. (Yes, it can be a rotisserie!)
Juice of two limes and the zest of one
2 stalks of celery, cut in fine dice
1 tiny red onion (or a quarter of a bigger one), minced finely
1/2 of a Granny Smith Apple, peeled, cored and finely diced
1 teaspoon of Entube Curry Paste (or less of you’re sensitive to heat)
1-2 teaspoons of less spicy curry powder (optional)
1/2-3/4 cup of mayonnaise, either Hellman’s or your own
1 tablespoon of Major Grey’s Chutney (avoiding the few super secret raisins hidden in the jar)
Salt to taste-about a teaspoon or so
A big handful of chopped cilantro
A big handful of toasted, slivered almonds
Method
Squeeze the lime juice onto the chicken in a large bowl. Fold in the zest and the rest of the ingredients, except the almonds. Serve in a pretty bowl with the nuts sprinkled on top.

Buy this now! Hi
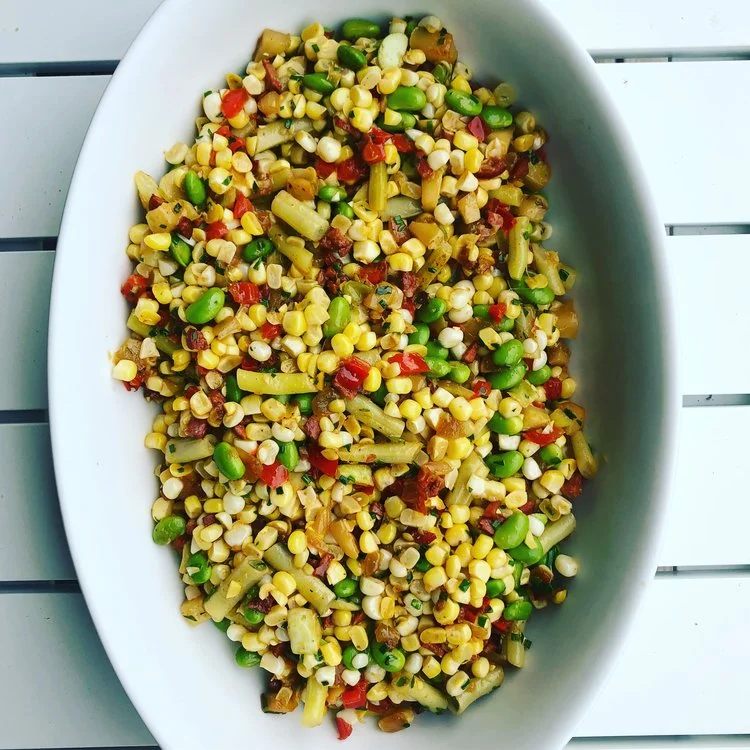
Summering Succotash
It’s Sunday and 5am. I’m tired as hell, ready for a day off, and what am I doing? Thinking, reading, and writing about food. Specifically, succotash. Honestly, I can’t believe I’m even admitting this in a public forum!
I did not grow up eating succotash, but I truly adore it. Curious about the origins of this dish, I just Googled it and was surprised to find out that the name is actually derived from a Narragansett word for “broken corn” which makes sense, corn being the main ingredient. My association with it as a southern dish is not unfounded, but it tends to be more of a catch all title for any kind of vegetable medley, involving corn.
Oh, corn! It is so good at this very August moment, but philistine that I am, I hate eating it on the cob. It literally drives my teeth insane. Because of this sad state, I am always looking for ways to eat corn off the cob. You can see where this is going, right?
But before I tell you how to cook the dish, I’m going to digress again and profess my love for flexible and easy going recipes. Also for recipes that can be prepped a bit in advance and finished off at the last minute. I also want to express adoration for a recipe that can be eaten cold the next day, uses ingredients that are local and seasonal, and (in my case) almost entirely vegetable. This recipe hits all the marks (please check out the additional suggestions below).

Summer Succotash
Ingredients
2 T butter or ghee
1/2 of a red pepper, cut in small dice
1/2 of a vidalia onion, also cut in small dice
1 clove of garlic, minced
1 link of good linguiça, cut into tiny dice
1 or 2 small patty pan squash, cut into small dice
2 T butter or ghee
4 ears of corn, shucked and kernels removed (I lay the corn on its side and cut lengthwise).
Around 12 good sized green or wax beans, quickly cooked in salty boiling water for a minute and then shocked in ice water and chopped into one inch pieces
1 C cooked Lima beans or edamame (I used edamame as there were no shell beans in at the farm)
A handful of minced chives
Salt and pepper to taste (careful with the salt-linguiça is salty!)
Method
Get a nice big sauté or frying pan and heat over medium low heat for a couple of minutes, before melting the butter. Sauté the peppers,onions, and garlic for a few minutes, stirring and NOT browning. Add the linguiça and turn the heat up a notch. When some of the fat has rendered, crank the heat to high, add the squash and a half cup of water. Shake and cook for a minute or two. Add the remaining butter and then dump in the corn and both beans. Shake and cook for another minute or two, just to heat through. Taste for salt, generously pepper and sprinkle in the chives.
Suggestions
If you want to prep ahead, stop after the squash is cooked. When you are ready to eat, heat the remaining butter in a separate pan, quickly heat up the corn and beans and then add the squash misxture.
If you don’t eat meat, omit the linguiça and maybe throw in a spoonful of smoked paprika.
As mentioned, eat this cold the next day with a little salad dressing if you like. Or reheat and top with a fried egg and hot sauce for breakfast.

Corn Fritters from my Grandmother Marjorie
As a child, I knew my grandmother’s zucchini were out of control when the “pancakes” started showing up on the table at meal times. They were made in the same vein as her potato latkes, light and crispy-almost frilly-around the edges. Some had dill and a little cottage cheese and others had chives and no cheese at all. I grew up watching Marjorie make these kinds of recipes up, or so it seemed. Turns out, she had a general idea of the ratios for certain dishes and they could be used across a multitude of main ingredients, in this case the pancake (or fritter, as I came to know them). So, the same thing happened when her corn came in and we never complained one little bit.

Last week the corn came in at Bartlett’s Farm. This is a BIG deal on the island (I feel that it is an equally big deal when the corn at Moor’s End comes in too). I happened to be at the market when the young man wheeled the first cart up to the corn table and I asked if that indeed was the first of the year. He nodded yes and handed me an ear, smiling. I am going to admit that I had a moment where I was all like, “where’s the newspaper guy with a camera? I HAVE THE FIRST EAR OF CORN!” Yeah, I felt that I deserved a little fame for getting up early and being in the right place at the right time. Sadly, the press had NOT been alerted, and so I went on my way and took that bunch of corn and did the first thing I do every July. I made a batch of fritters and served them to my gracious clients for lunch. And said a quiet thank you to my kitchen angel, Marjorie, without whom I wouldn’t have a clue about food. Thanks, Gram. This one is for you.

Corn Fritters
Ingredients
3-4 ears of corn, shucked and kernels removed in the least messy and chaotic way you know how (no comment from me here-I tend to have sporadic luck in this department)
2-3 scallions, minced nice and fine
1/2 of a roasted red pepper (freshly made or from a jar-your choice-we just like the hint of red here)
A handful of minced chives (or any other green herb you like)
One handful of flour, I use the GF Cup-3-Cup kind, but any kind of regular flour works too
1 t baking powder
1 egg, beaten
An optional 1/2 cup of feta or other crumbly white cheese (I only do this occasionally and typically when the corn are getting older)
Salt and Pepper to taste
Yellow Oil or Ghee for frying
Method
This is literally the easiest thing in the world. Mix the first four ingredients and sprinkle the flour and powder of them and toss with a large fork. Add the egg and cheese if you are using and salt and pepper. Heat a nice large skillet over a medium heat-cast iron is best-until a drop of water dances on the surface. Pour enough oil or ghee in the pan to cover the bottom generously. Drop between an 1/8 to a 1/4 cup of the corn mixture onto the skillet and cook until brown, flip and set onto a warmed plate (you can keep them warm in a low oven if you like).
I serve these in different ways. Sometimes, I grill a piece of fish and do a fresh salsa, occasionally I get fancy and do smoked salmon, creme fraiche, pickled red onions and minced fresh dill, other times, a nice crispy chicken thigh and some sweet chili sauce does the trick. They are such a great vehicle for sauces and protein sides...Experiment, please! And let me know what you think.
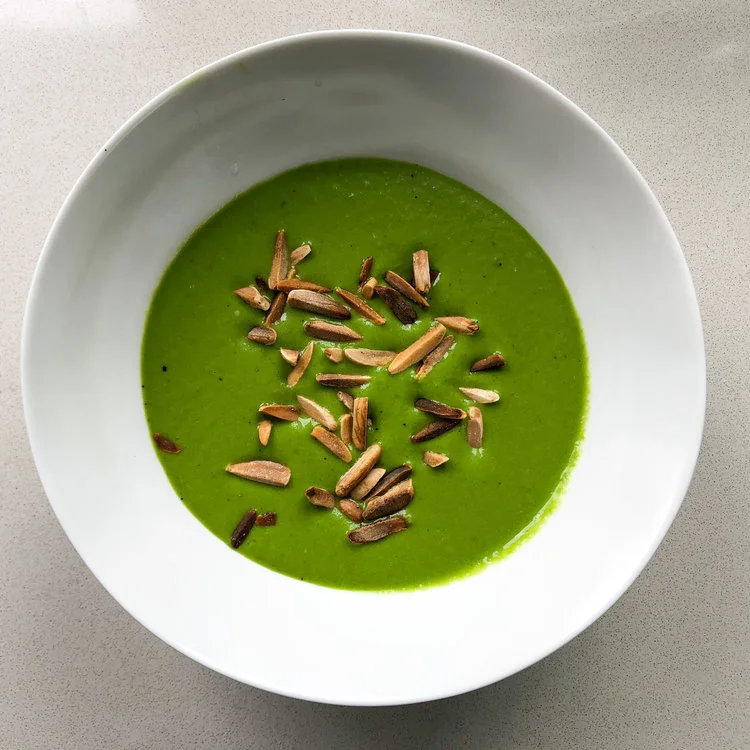
Green Gazpacho
Green is my favorite color; every shade and hue. It’s also my favorite color for vegetables-I love ALL the greens! As the heat continues on our beautiful island, I’ve taken advantage of the beautiful produce from our island farms, Moor’s End and Bartlett’s, and spun together this green gazpacho, which I serve alongside a delightfully delicious grilled cheese number (Pain D’Avignon French sandwich bread, arugula pesto, homemade aioli, aged Gouda, and farm tomatoes). The acidic, bright and chilly soup is a great foil to that umami bomb of a sandwich.
I don’t know how I’d be able to function without my trusty Vitamix. I’ve become so reliant on it for so many things, especially quick soups. This one is easy, beautiful and delicious. If you have a spare 20 minutes, get yourself moving and make some. Fancy it up in a special bowl or drink it from an old jelly jar, and then tell me how you liked it.

Serves 6
Ingredients
1 bunch of scallions, roughly chopped
1 green pepper, roughly chopped
1 large English cucumber, peeled, seeded and roughly chopped
1 clove garlic clove
1 t cumin
1 t smoked paprika
1/2 t salt
1 C Chicken or Vegetable Stock or Water
3 big handfuls of watercress, spinach, or arugula (or a combo)
1/2 bunch of parsley, minced
4 tablespoons olive oil
2 tablespoons sherry vinegar
Either Greek yogurt to swirl or toasted pumpkin seeds to sprinkle on top
Method
Combine the first seven ingredients in a strong blender. Pulse a bunch of times until everything is smooth. Add about a cup of water or stock and pulse again a few times.
Add the greens, parsley, olive oil and vinegar. Blend until smooth and thin a bit if necessary. Taste for salt and refrigerate until chilled (or pour into a bowl within a bowl of ice cubes to speed up the process.
Refrigerate until very cold.
Serve and swirl with yogurt, or sprinkle with seeds, or go crazy and do both!