
Roasted Whole Cauliflower with Romesco
By now, most cooks I know are over the whole cauliflower craze and that includes the one where you roast the cauliflower whole. I am not over it. I fucking love cauliflower in any shape or form, but by far the best shape and form is beautiful, perfectly bronzed, tender, majestic and roasted whole. This delicious vegetable may be gilded further by placing it in a generous pool of Romesco, another trendy sauce that I have not tired of yet. Both are super easy, particularly if you have a good blender or food processor to make the Romesco. I am also going to take this opportunity to pitch one of my favorite knives to you. It is perfect for getting the core out of the cauliflower, plus a million other tasks in the kitchen. It is cheap and easy to get (here on Amazon), and I know you will fall in love with it too: the bird’s beak paring knife!
There are a million recipes for both of these dishes and I am still going to share mine with you. What I will tell you is that the last time I made this combo, I used a jar of piquillo peppers that I had hanging around and it elevated the Romesco to new heights. I loved this brand and it was perfect-not too spicy, deep pepper flavor and the most beauteous dark red color. I highly recommend subbing them in for regular roasted red peppers. If you get your cauliflower in the oven and make the sauce while it is cooking, this is a pretty hands-free situation. It is also gluten free, vegan and absolutely impressive to serve your friends and family. Cauliflower is perfection at this very moment, so run to the farmer’s market, get some and make this today!

Roasted Whole Cauliflower with Romesco
Serves a few hungry people as a side dish or two as a main course
Ingredients
1 large, perfect, beautiful cauliflower
Some decent cooking EVOO
Salt and pepper
2 cloves of garlic
3/4 cup of almonds, toasted
A large handful of parsley
1 14 ounce jar of Piquillo peppers, drained (I like this one)
1/4 cup tomato paste
3 tablespoons of GOOD sherry vinegar (I like this one)
2 teaspoons of smoked paprika
1/2 cup good EVOO
*cayenne-if you like spicy, add a 1/2 teaspoon, otherwise not necessary
Salt and pepper
Another handful of flat parsley leaves, casually torn
Method
Heat your oven to 400°. Carefully cut the core of your cauliflower out from the bottom (using your fabulous new bird’s beak knife) trying not to separate any florets from the stalk. Don’t overly worry if you do-you will get the hang of it in time. Place your cauliflower on a baking tray and drizzle olive oil over it-maybe 1/4-1/2 of a cup, depending on the size. Rub it all over so it is thoroughly greased up. Cover with foil and place in the oven. Bake for 30 minutes or so and then remove the foil, turn the heat down to 375 and continue to bake for about another hour or hour and a half. You are looking for burnished brown and tender throughout (use a cake tester, skewer, or toothpick to check).
While your beauty is in the oven, get out your blender, processor, or super sharp knife and bowl if you have neither (I am actually more of a processor fan for this task). Toss the first three ingredients into the machine and blitz till pasty. Add the peppers, tomato paste, vinegar, and paprika and blitz again till puréed. Slowly pour in the EVOO with the machine running and taste. Add salt, pepper, and (maybe) cayenne to your liking. If doing by hand, basically chop the hell out of everything and mix in the EVOO at the end. Or use a mortar and pestle and mash everything similarly. It will all taste delicious any way you do it.
When your cauliflower is finished, cut it into big meaty slices, and place it on a platter, which you have previously smeared great quantities of your gorgeous Romesco. Toss a great handful of the torn parsley leaves on top and proudly serve to your loved ones.

Elevated Hummus
A funny thing that not everyone knows about me is that I became the unlikely owner of a natural foods store on Nantucket Island when I was only 22 years old. Back in the late 80’s I was a vegetarian and cooked from the good old hippie standbys, The Moosewood Cookbook and Vegetarian Epicure. I baked an infamous cookie called Dani’s Healthy Cookie (which was apparently adopted without my knowledge by the Espresso Café, and either loved or made fun of forevermore), and I also made hummus. A ton of hummus. So much in fact, that I literally vowed to never make it again after I sold Nantucket Natural in 1994.
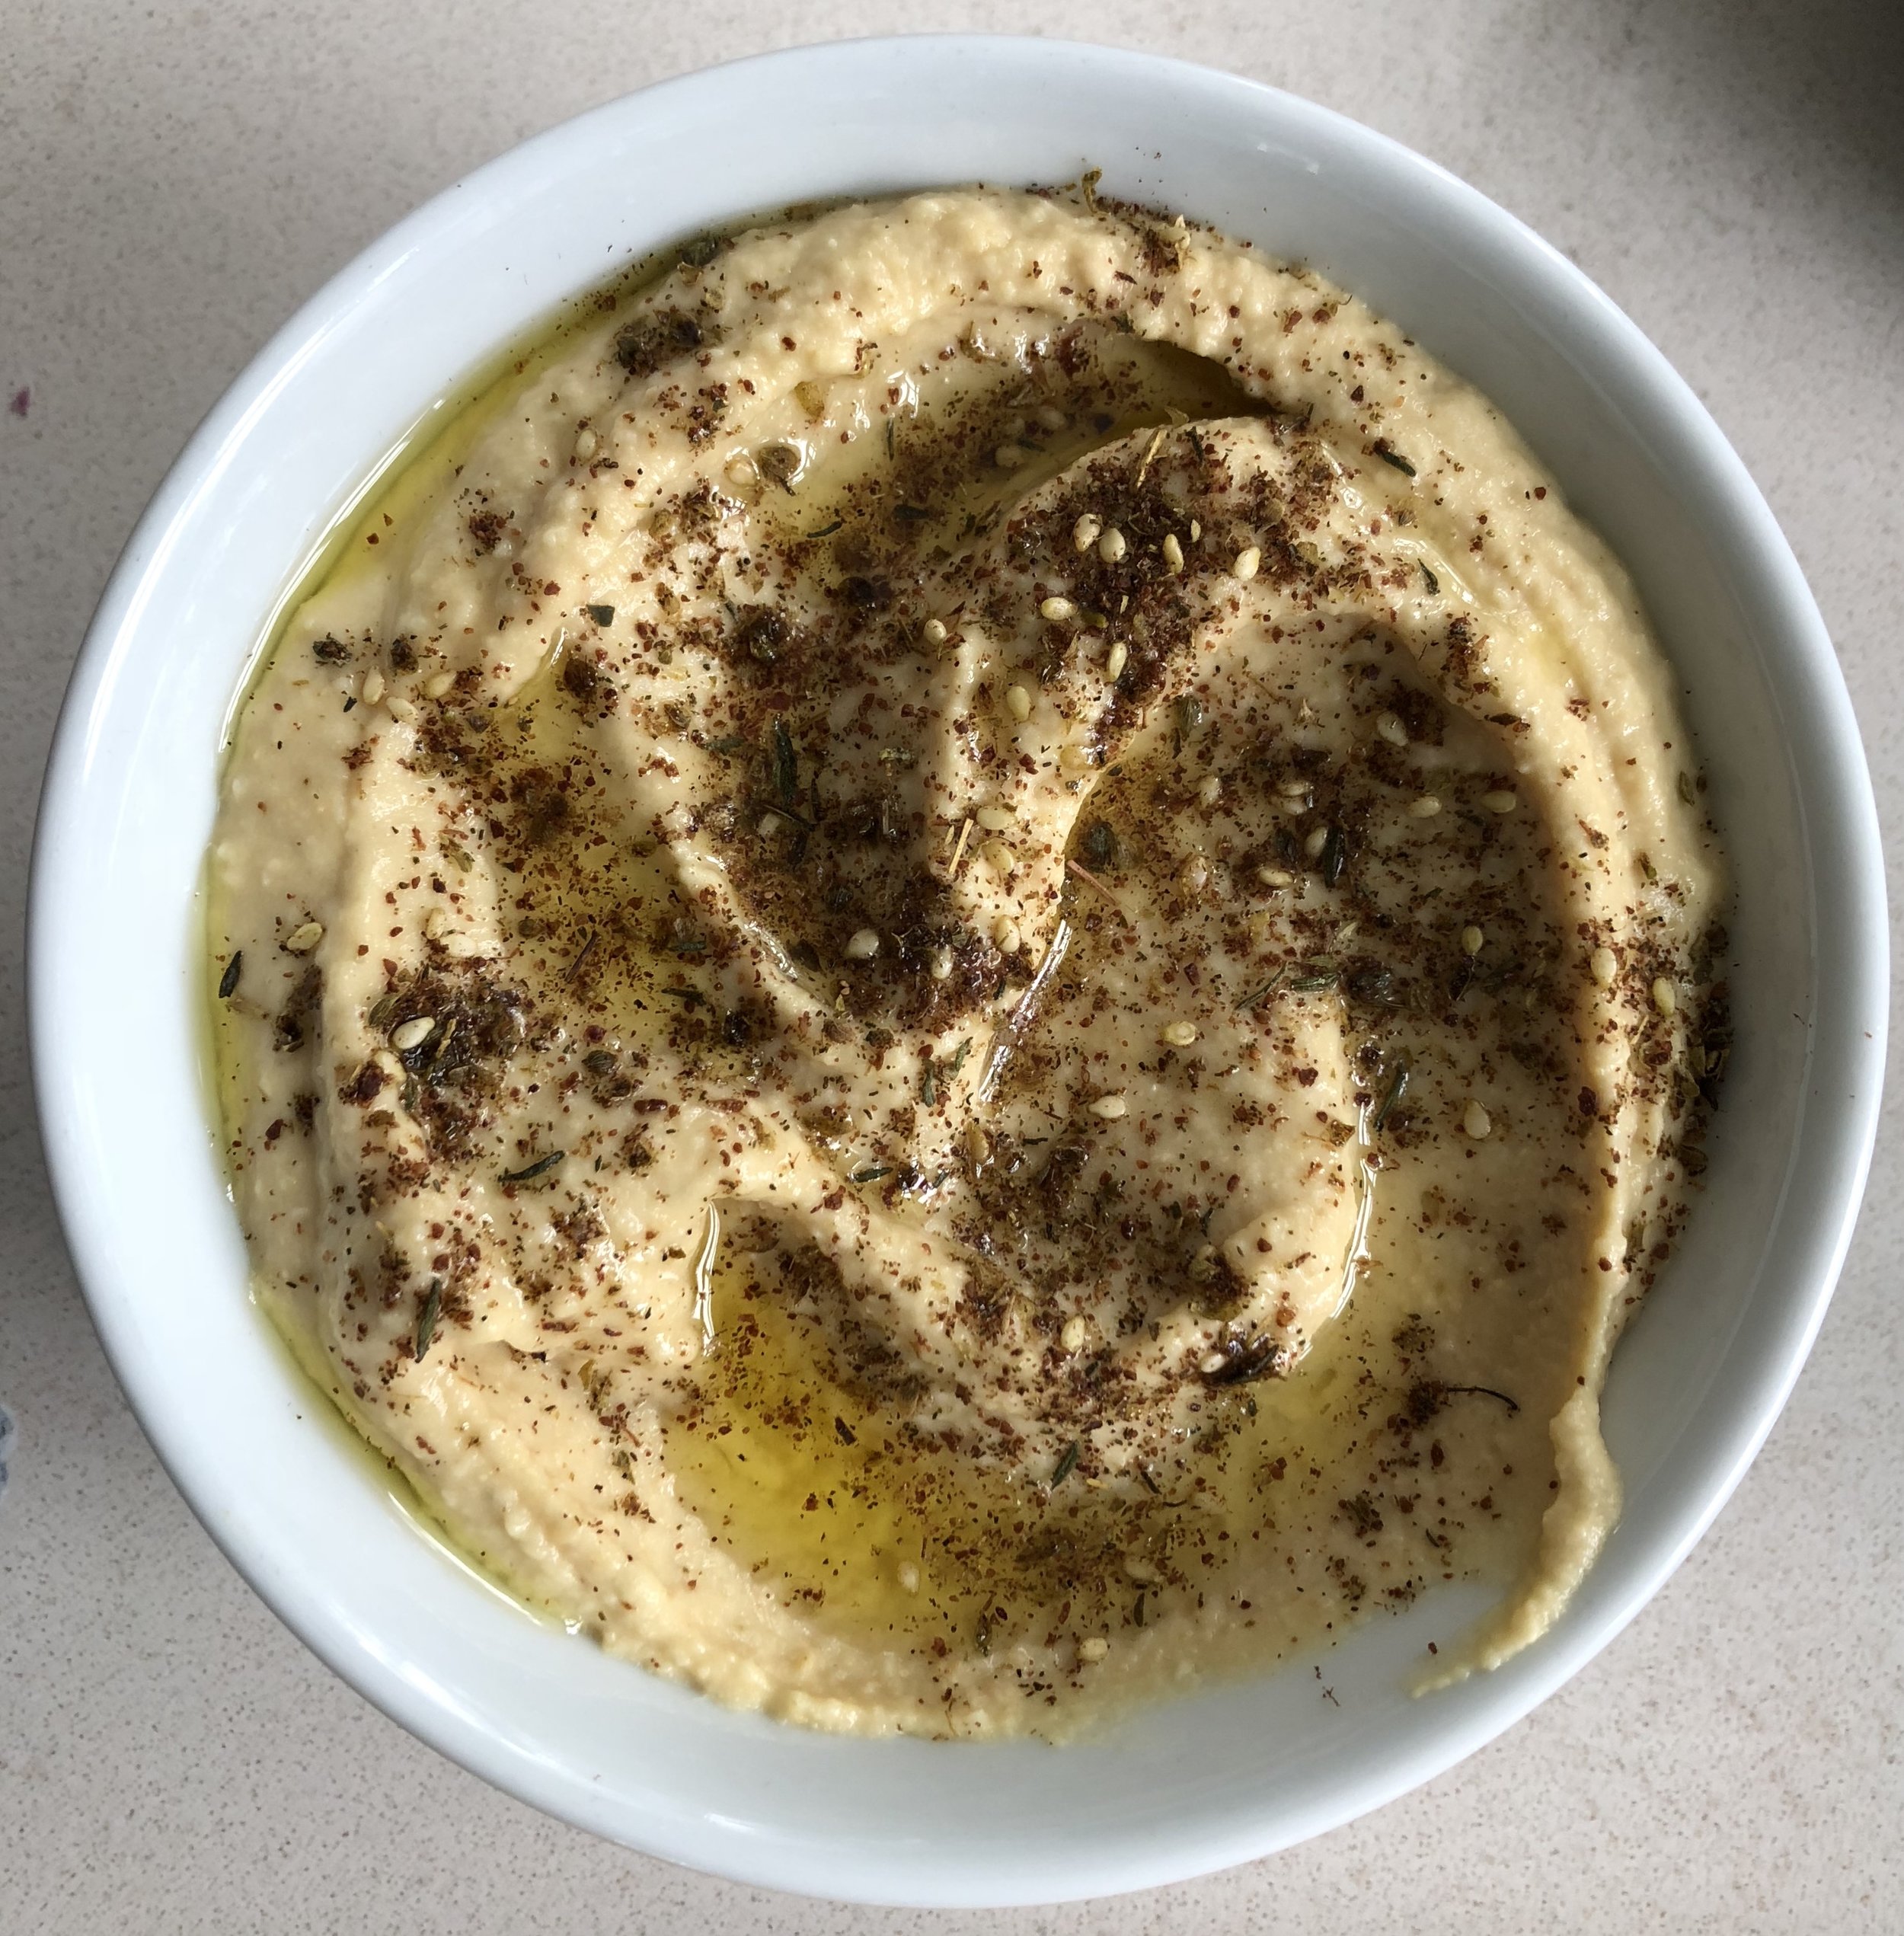
Well, I guess I’m a big fat liar because here I am, making it again, 20+ years later. This time I have a little more knowledge and verve to add to the otherwise boring standby. Did you know that removing the skins of the chickpeas make for the silkiest and smoothest hummus ever? It also makes them 100% more digestible! To do this, one soaks the dried peas overnight and then cooks them with a little baking soda in a pan, before adding the water to boil them. The skin comes off easily this way. Today however, I was lazy and bought a new brand of cooked garbanzos from Fig Foods. I drained them into a bowl, reserving the liquid, and rubbed them between my hands and the skins came right off. I really recommend them-the flavor and texture were great (they come in a bag, which may make that difference?).
Do you need another hummus recipe? Probably not. Am I going to share mine anyway? You bet! Enjoy!
Newfangled Hummus
Makes around two cups
Ingredients
2 cups of cooked chickpeas, without their skins, liquid strained and set aside
3 tablespoons of tahini (I like this brand)
2 small cloves of garlic, minced
1 teaspoon ground cumin
1 teaspoon ground coriander
1 big pinch cayenne
Juice and zest of one lemon
1/2-3/4cup of EVOO (your call)
1/2-1 teaspoon salt (your taste)
Chickpea liquid (see below)
Za’atar spice blend to sprinkle
Method
Put the first seven ingredients into the bowl of a food processor (or blender) and mix until completely puréed. Add 1/2 cup of EVOO (to start) and the salt. Blitz another minute. Taste. Add a little more oil if you like. Now, slowly add the chickpea liquid, a spoonful at a time, until you arrive at the best consistency for you! Scrape into a pretty bowl, swirl the top with the back of a spoon, drizzle some EVOO and sprinkle with Za’atar.
Keeping it cool and cucumbery
It’s been a challenge to turn the stove on this week. I feel so lucky to live on an island in the middle of the ocean, where there is almost always a breeze and it’s usually 10-20° cooler than the mainland. The past few days have thrown that notion out the window however, with temperatures in the mid to high 80’s with heavy duty humidity...Okay, no more complaining about the weather. How about the topic of cold soups?
I keep hoping to see field tomatoes at Bartlett’s and they are still not in! Moors End has some that are a little funky and misshapen. Just not a great year for the tomatoes, I guess. But cucumbers on the other hand....They are spectacular! I love the English variety from Moors End-advertised as “burpless”, they have few seeds and are super crispy and refreshing. Just the thing for making a quick batch of cold cucumber soup!
I fed two ladies for lunch and this recipe made exactly enough. I have also made it for a crowd and the measurements may be easily doubled or tripled.
Cold Cucumber Soup
ingredients
1 large English cucumber (just about a pound), peeled, seeded and chopped
1 cup of plain yogurt (literally any kind you like, even dairy free)
1/2 cup of buttermilk (or water if going dairy free)
1 tablespoon of minced shallot
1 clove minced garlic
2 T sherry vinegar
A handful each of minced parsley, chives, and dill
Salt and pepper to taste
Water to thin the soup
Method
Literally dump all the ingredients, except the salt, pepper and water into a blender and blast at the highest speed until puréed. Add the last three ingredients to suit your preferences for flavor and consistency. Serve super cold with some more herbs on top, or croutons, or an herb oil...

Corn Fritters from my Grandmother Marjorie
As a child, I knew my grandmother’s zucchini were out of control when the “pancakes” started showing up on the table at meal times. They were made in the same vein as her potato latkes, light and crispy-almost frilly-around the edges. Some had dill and a little cottage cheese and others had chives and no cheese at all. I grew up watching Marjorie make these kinds of recipes up, or so it seemed. Turns out, she had a general idea of the ratios for certain dishes and they could be used across a multitude of main ingredients, in this case the pancake (or fritter, as I came to know them). So, the same thing happened when her corn came in and we never complained one little bit.

Last week the corn came in at Bartlett’s Farm. This is a BIG deal on the island (I feel that it is an equally big deal when the corn at Moor’s End comes in too). I happened to be at the market when the young man wheeled the first cart up to the corn table and I asked if that indeed was the first of the year. He nodded yes and handed me an ear, smiling. I am going to admit that I had a moment where I was all like, “where’s the newspaper guy with a camera? I HAVE THE FIRST EAR OF CORN!” Yeah, I felt that I deserved a little fame for getting up early and being in the right place at the right time. Sadly, the press had NOT been alerted, and so I went on my way and took that bunch of corn and did the first thing I do every July. I made a batch of fritters and served them to my gracious clients for lunch. And said a quiet thank you to my kitchen angel, Marjorie, without whom I wouldn’t have a clue about food. Thanks, Gram. This one is for you.

Corn Fritters
Ingredients
3-4 ears of corn, shucked and kernels removed in the least messy and chaotic way you know how (no comment from me here-I tend to have sporadic luck in this department)
2-3 scallions, minced nice and fine
1/2 of a roasted red pepper (freshly made or from a jar-your choice-we just like the hint of red here)
A handful of minced chives (or any other green herb you like)
One handful of flour, I use the GF Cup-3-Cup kind, but any kind of regular flour works too
1 t baking powder
1 egg, beaten
An optional 1/2 cup of feta or other crumbly white cheese (I only do this occasionally and typically when the corn are getting older)
Salt and Pepper to taste
Yellow Oil or Ghee for frying
Method
This is literally the easiest thing in the world. Mix the first four ingredients and sprinkle the flour and powder of them and toss with a large fork. Add the egg and cheese if you are using and salt and pepper. Heat a nice large skillet over a medium heat-cast iron is best-until a drop of water dances on the surface. Pour enough oil or ghee in the pan to cover the bottom generously. Drop between an 1/8 to a 1/4 cup of the corn mixture onto the skillet and cook until brown, flip and set onto a warmed plate (you can keep them warm in a low oven if you like).
I serve these in different ways. Sometimes, I grill a piece of fish and do a fresh salsa, occasionally I get fancy and do smoked salmon, creme fraiche, pickled red onions and minced fresh dill, other times, a nice crispy chicken thigh and some sweet chili sauce does the trick. They are such a great vehicle for sauces and protein sides...Experiment, please! And let me know what you think.
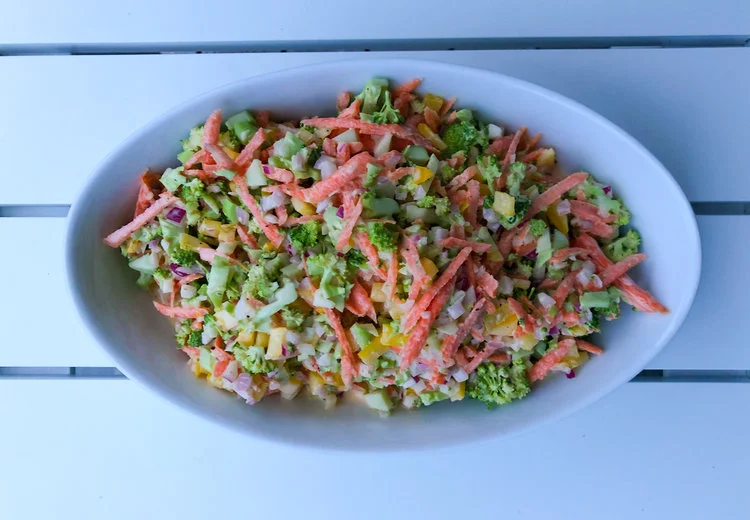
Broccoli Slaw
One of the curses AND gifts of being a private chef is that you have the freedom to make different foods everyday and to experiment with new recipes or ideas that intrigue you. I have made so many different types of slaws over the years-a few from glossy photos in magazines, some from those old timey church lady cookbooks, Instagram-inspired slaws (of late), and occasionally you make a slaw out of whatever it is that you can find in the vegetable bin at that particular moment.
On Nantucket this summer, the combination of terrible winter weather, cold and endless spring and foggy/damp summer has affected the growing season. While we are still not seeing field tomatoes at the farm stands, I have seen broccoli, and it is gorgeous! So, to make a long story short, here’s broccoli slaw!

Kitchen Sink Broccoli Slaw
Ingredients
About two cups or so of broccoli florets, cut as tiny as you dare
A large carrot, grated over the largest holes of the box grater
1/2 each of a green and red pepper, in a tiny dice
A good handful of red onion, also in a tiny dice, soaked in a few tablespoons of red wine vinegar for 5 minutes and saved (see below)
Dressing
1/3 C buttermilk
1/3 C Mayo (mine was homemade garlic aioli from another recipe)
1/4 C of red wine vinegar (include the vinegar you will drain from the onions)
A very healthy squirt of honey-I used hot honey, which is chili infused and costs the world at a fancy food shop
Two big fistfuls of fresh green herbs-parsley, cilantro, chives, tarragon, mint? Be bold and decide for yourself!
Salt and pepper to taste
Slivered almonds or any other nut, toasted to throw on top if you like (I had some and forgot!)
Method
Gently combine the salad ingredients and then whisk together the dressing ingredients and taste-add more acid or sweet as necessary. Thin with a little water if it seems too thick. Dress the salad carefully-start with less and add a bit at a time to avoid the overdress! Pile it in a bowl and chill. If you have something crunchy to top it with, do that right before you serve
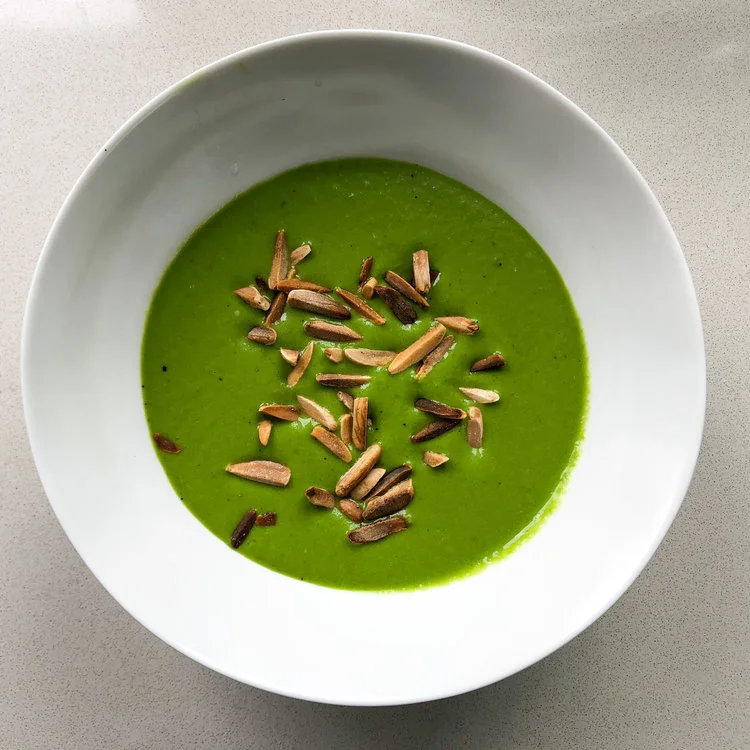
Green Gazpacho
Green is my favorite color; every shade and hue. It’s also my favorite color for vegetables-I love ALL the greens! As the heat continues on our beautiful island, I’ve taken advantage of the beautiful produce from our island farms, Moor’s End and Bartlett’s, and spun together this green gazpacho, which I serve alongside a delightfully delicious grilled cheese number (Pain D’Avignon French sandwich bread, arugula pesto, homemade aioli, aged Gouda, and farm tomatoes). The acidic, bright and chilly soup is a great foil to that umami bomb of a sandwich.
I don’t know how I’d be able to function without my trusty Vitamix. I’ve become so reliant on it for so many things, especially quick soups. This one is easy, beautiful and delicious. If you have a spare 20 minutes, get yourself moving and make some. Fancy it up in a special bowl or drink it from an old jelly jar, and then tell me how you liked it.

Serves 6
Ingredients
1 bunch of scallions, roughly chopped
1 green pepper, roughly chopped
1 large English cucumber, peeled, seeded and roughly chopped
1 clove garlic clove
1 t cumin
1 t smoked paprika
1/2 t salt
1 C Chicken or Vegetable Stock or Water
3 big handfuls of watercress, spinach, or arugula (or a combo)
1/2 bunch of parsley, minced
4 tablespoons olive oil
2 tablespoons sherry vinegar
Either Greek yogurt to swirl or toasted pumpkin seeds to sprinkle on top
Method
Combine the first seven ingredients in a strong blender. Pulse a bunch of times until everything is smooth. Add about a cup of water or stock and pulse again a few times.
Add the greens, parsley, olive oil and vinegar. Blend until smooth and thin a bit if necessary. Taste for salt and refrigerate until chilled (or pour into a bowl within a bowl of ice cubes to speed up the process.
Refrigerate until very cold.
Serve and swirl with yogurt, or sprinkle with seeds, or go crazy and do both!