
Bespoke Granola
While wearing my private chef hat, I spend an inordinate amount of time weaving in and out of supermarket aisles. I sometimes get hung up in sections with too many choices (thanks, Libra sun!). Store bought granola baffles me. Seriously. I can’t understand why folks feel a need to buy a food that is so absurdly simple to make at home. Okay, I know not everyone has time or space for this, but it doesn’t have to be a major production! A sheet tray, a large mixing bowl, and some parchment will make it easier for you.

And the true beauty is that a recipe like this can be personalized to be your very own. Play around with the amount of sweetness (or type of sweetener!), add different spices or extracts, switch up the seeds and nuts, add a dried fruit (or not!)...Nobody else in the world will have granola like yours! Bespoke granola! Yay!

Read on. You are going to become a convert and spread the good word accordingly! No more standing in the cereal aisle with that look on your face, wasting your precious life! Do this now.
Bespoke Granola
Makes a LOT-about 8-10 cups (depending on how casually you measure things)
Ingredients
4 1/2 cups GOOD oats (this means Bob’s Red Mill!)
1 1/2 cups slivered almonds
1 cup large and unsweetened coconut flakes (Bob’s!)
1 1/2 cups pumpkin seeds
1/2 teaspoon salt
1/2 teaspoon powdered ginger
1 teaspoon cinnamon
1 teaspoon vanilla extract
3/4 cup liquid coconut oil (like this)
3/4 cup maple syrup (the darker the better)
1/3 cup dark brown sugar (or less or more)
1 1/2 large egg whites (1.5 liquid oz)
Method
Heat the oven to 325°. Spread parchment on two 1/2 sheet trays. Get your large bowl and dump all the ingredients into it. Mix well with your clean hands (or a spoon if you’re squeamish). Spread equally onto the two trays and bake for 40-60 minutes, switching trays around, until deep golden brown. If you can resist the urge to mess with it, there will be big glossy chunks of delicious granola. If it is baking unevenly and you need to move it around with a spatula, that is ok too! It will be less chunky, but still beautiful and delicious-my two favorite words.
Cool and keep in an airtight container. Or freeze in ziplock bags. Or share with people you love.

Corn Muffins: Load 'Em Up!
I love foods that are portable, cover a few food groups, and are delicious. You may see a thread running through some of my baked good recipes, which is that while I love a good sweet once in a while, my true love is in the land of savory.
Muffins have never been my thing. I don’t mind making them and I make them pretty well, but for a breakfast treat, I’ll take a popover, quiche, frittata or egg sandwich any day. However, if a savory bread element is needed to round out a meal, I will always turn to a solid cornbread, cornstick, or corn muffin. And I prefer the muffins loaded. Loaded with what, you ask? Here’s the part where I get to preach about possibility and trying new combinations of flavors, using what you have on hand! Yay!

Here are a few things I’ve put in my loaded corn muffins over the years: cheeses of all varieties (gruyere, cheddar, blue cheese crumbles, parmesan, pecorino, asiago, smoked gouda); alliums of all varieties (scallions, sautéed and finely minced leeks/vidalia/red onions/garlic); seasonal veggies (coarsely grated, salted, and squeezed summer squash, roasted red pepper, grilled corn, minced leftover broccoli); and any freshly minced herbs you’d like to use.
So, there is a basic recipe to give you a base, then it’s up to you to go for it and load them up! I give some basic measurements, but you can experiment. As a rule, try not to add any extra moisture once your batter is mixed. So keep things less liquid and dry your veggies off before stirring them in.
As always, I use my beloved Bob’s Red Mill cornmeal and gluten free flour mix (or King Arthur, if gluten is your friend). If you don’t have buttermilk, try the replacement suggested below. In a pinch, add a squeeze of lemon juice to regular milk and let it sit for a few till it looks curdled. Gross, but delicious. These muffins can almost fill in for a meal on the run. They are great for a picnic or lunch box. Your savory friends and family members will love you.
Loaded Corn Muffins
Makes 12 large muffins (or a million mini-muffins. I truly have no idea!)
1 cup of GF flour (or regular)
1 cup of coarse cornmeal (see above)
1 tablespoon sugar
2 teaspoons baking powder
1 teaspoon kosher salt
1/2 teaspoon of baking soda
1/2 teaspoon of dried mustard powder
1/8 teaspoon of cayenne pepper
2 large eggs
6 tablespoons of unsalted butter, melted
1 cup of buttermilk (or 1/2 cup yogurt mixed with 1/2 cup milk)
1/4 cup minced fresh chives
1/2 cup of roasted red pepper from a jar, drained, patted dry, and finely diced
1/2 cup of grated asiago cheese
1/2 cup of cooked (grilled is best) corn, cut off the cob
Fix up a 12-muffin tin with paper liners (for large muffins). Heat the oven the 375. Sift or whisk the dry ingredients together in a big bowl. In a smaller bowl, beat the eggs and then add the melted butter, still mixing. Add the buttermilk last and make sure the mixture is combined well. Dump the wet into the dry ingredients and give a quick stirring to mix. Add the chives, red pepper, cheese and corn and mix only until just combined. Use an ice cream scoop to fill the muffins. Bake for 20-25 minutes until a wooden tester comes out dry and they are lovely and brown and spring back a little when you poke them gently.

Okay, I do occasionally make blueberry muffins, from time to time…

Dressing Salad
I dress leafy greens, vegetables, and a variety of beans, meats and fishes every single day. There is no greater delight for me than a trip to the farm stand and the resulting beauty of a composed (or totally messy) salad with its accompanying acidic/oily/salty/spicy counterpart. I possess and arsinal of incredible oils, vinegars, spices...even a cutting garden with fresh herbs. All of these elements are essential for making a great dressing or sauce and so make sure you have at least one good bottle of olive oil and two or three great vinegars in your pantry. Kosher salt and a pepper mill with fresh peppercorns are also critical for success. If you have the space to keep garlic, onions, and a lemon or two on the counter, please do this too. The secret weapon that I find most cooks leave out of their homemade dressings is a sweet element, which serves to balance the acid. My go-to is raw unfiltered honey, but I’ve been known to use white/brown/coconut/date sugar, agave...You know, whatever is handy. You may also be like me in that you tend to collect fancy mustards (you know who you are!). If you don’t, buy one small jar of good Dijon and keep it just for this purpose.
I think everyone should have a few great salad dressings in their repertoire, ones that you don’t need to measure or look at a recipe to make. I am going to give you a gift and tell you the one my grandmother taught me. But first I will digress about kitchen tools (one of my favorite topics) and the state of my right hand (not good).

That beautiful creamy dressing was made with a machine! Yesss!
As a seasonal private chef, my days are spent reading, planning, shopping, running around, prepping, cooking, and cleaning up. Much of each day is spent on my feet, using my hand in repetitive motion. This year I was diagnosed with Dupuytren’s Disease, a progressive condition affecting the hand (read all about it here). In response (after freaking the f$#k out), I have been trying some dietary and “alternative” treatments (acupuncture and massage have been very effective), and have also adapted some of my kitchen practices to lessen the load on my hand. Instead of using my beloved knife for every single task, I now pick the jobs where beautiful knifework is imperative and use a machine for the rest.
Working in the kitchen of a beautiful home often requires form over function, one of the challenges of my job. This might require keeping unsightly appliances off of the counters. Because I make so many dressings and sauces, I invested in a small, lightweight food processor (this one, from Amazon). It is stored under my counter, and I have trained myself to use it on a daily basis. It gives my hand a break and emulsifies beautifully. While I love a bowl and a whisk, I have grown very fond of this little powerhouse and encourage those who are infirm or short on time (or who just love cute little appliances), to give one a whirl (sorry, couldn’t resist). Okay, onward to the recipe!
Best Simple Salad Dressing to Memorize Forever
Makes around a cup or so, and will keep for days in your fridge in a covered jar
Ingredients
1 tablespoon of shallot, finely minced
1 very small clove of garlic, finely minced
1/3 cup of vinegar (red wine, white wine, or champagne)
2 teaspoon of mustard
1 teaspoon of honey (or sugar, or agave...)
1/2 cup of good EVOO (or more to taste)
1/4 teaspoon kosher or sea salt
A few good grindings of pepper
A handful of fresh herbs (I typically go for chives, parsley, tarragon, and/or basil)
Method(s)
In a small-medium sized bowl, soak the shallot and garlic in vinegar for about 10-15 minutes (prep your greens while this happens). Whisk in the rest of the ingredients until the mixture is a little thick and emulsified. Or toss the shallot and garlic into your machine to mince, add the vinegar and wait. Then add the rest of the ingredients and blitz till emulsified. Or use a jar and shake, shake, shake.
When you dress a salad, start out conservatively. Overdressing is a sad state of affairs and easily prevented. Also, don’t forget to dress the protein, if you’ve included one. Whenever there are greens and veggies to toss, I recommend you use your freshly washed hands for the job. Do this out of the eyesight of your family, guests, or clients. It is the absolute best method, but for some reason also tends to alarm people. Anyhow, HANDS. So important, so take good care of yours!

Nostalgia Alert! Flounder stuffed with Crabmeat
When I was a kid, we went out once or twice a summer with my grandparents. Usually to Captain Tobey’s Chowder House or Cy’s Green Coffee Pot, two Nantucket fixtures. Both had early bird specials and featured local dishes (think: Clam Chowder, Shrimp Scampi, Littlenecks on the Half Shell, Brown Bread (baked in a coffee can), and Indian Pudding-a story in itself for another day). We always ordered one precious Shirley Temple, which was HUGE, as we were basically never allowed processed food or shitty, sugary, chemically drinks, like soda. My favorite food to order was any seafood with stuffing. Shrimp and flounder were the two most popular-super savory and usually a little greasy and over-cooked, but somehow they hit the sweet spot for me. Salty, starchy, and filling, I would seriously about this treat all summer.
Those nights out were pretty rare and unusual, but I think what was more unusual is the way we ate at home with my grandparents during the summer. Looking back now, I know my grandmother’s take on food was out of the ordinary. The way she revered vegetables, growing them organically and making them the center attraction on a plate in the early 1970’s; her love of a great single piece of cheese; the maniacal cutting of recipes from the NYT food section each week; the excitement she shared when her first tomatoes ripened; the smells and sounds of coffee being ground and french-pressed every morning; I could keep writing for days...
I guess my point is that those couple of nights out had a glamour and appeal because they were foreign and rare. But the grounded, real and important eating in my life, the eating that has stuck with and inspired me the most, all happened right at home at her kitchen table.
We never did eat any “fancy” stuffed seafood at home, but last summer while eating a beautiful meal at Nantucket's beloved Ventuno Restaurant, the chef sent me and my husband a dish from the kitchen. A gorgeous piece of fresh flounder, stuffed with crabmeat and topped with roasted red pepper crema and fresh herbs. A total throwback and also a revelation! I immediately went to work figuring out the technique and cooking it for my client. It has become part of my repertoire now, easy and quick to prep and finished in a hot oven in 10-20 minutes. And it still totally hits that perfect savory spot, all these years later.

Crabmeat Stuffed Flounder with Red Pepper Crema
(Thank you for the inspiration, Ventuno!)
Makes 4 Stuffed Filets (two hungry people for dinner or four for lunch with salad and some good bread)
Ingredients
Stuffing
1/4 cup of very finely diced onion, scallion, or leek
1/4 cup of very finely diced bell pepper (any color)
1/4 cup of very finely diced celery
1 tablespoon of butter
1/4 teaspoon of dried thyme
1/4 cup of dry white wine
2 tablespoons of minced chives
1 tablespoon of minced parsley
1 teaspoon Worcestershire sauce
8 ounces of the best crabmeat you can afford (I like this brand)
1/3 cup of GF or regular panko breadcrumbs
1 egg
1 teaspoon of Dijon mustard
1 tablespoon of Mayonnaise
a generous pinch of salt and grinding of black pepper
4 filets of flounder, skin off (around 1/2 to 3/4 lb)
1 tablespoon of EVOO
Crema
1 large roasted red pepper (DIY or high quality from a jar)
1 small garlic clove, smashed with a little kosher salt
1/2 cup of EVOO
1 teaspoon sherry vinegar
salt and pepper
Method
Stuff the fish!
Oven to 400 degrees. Line a small baking tray with foil and grease it with some kind of oil or cooking spray.
Sauté the first three ingredients in butter over a medium low heat in a frying pan until they are soft-around 3-4 minutes. Add the thyme, stir, crank the heat to high and pour in the wine. The moment the liquid is evaporated, remove from the heat and stir in the chives, parsley and Worcestershire. In a large bowl, gently mix the crabmeat with the sautéed ingredients and panko. Beat the egg, mustard, mayo, salt and pepper and fold into the crabmeat mixture, trying not to break up the crabmeat too much. Gentle hands! (I actually use my hands to do this, as you may find a stray bit of cartilage and it really keeps from over-mixing).
Lay the filet flat with the skinned side up. Divide the filling and place a quarter of it on the bottom edge of each fish and carefully roll it up, not too tightly. Place on your prepared tray and drizzle with a bit of EVOO. Bake in the oven for around 15-20 minutes, until the stuffing feels firm and a little springy when you poke it. The fish will cook faster than the stuffing, but it will stay moist (and you will cover it with delicious sauce!).
Make the crema!
Sorry, but you need some sort of blender or food processor to do this. Puree the pepper with the garlic and slowly drizzle the oil in until the whole mess is emulsified. Add the vinegar and then taste for salt and pepper. Spoon over the fish to serve. Keep it super classy and chiffonade fresh basil to sprinkle on top.
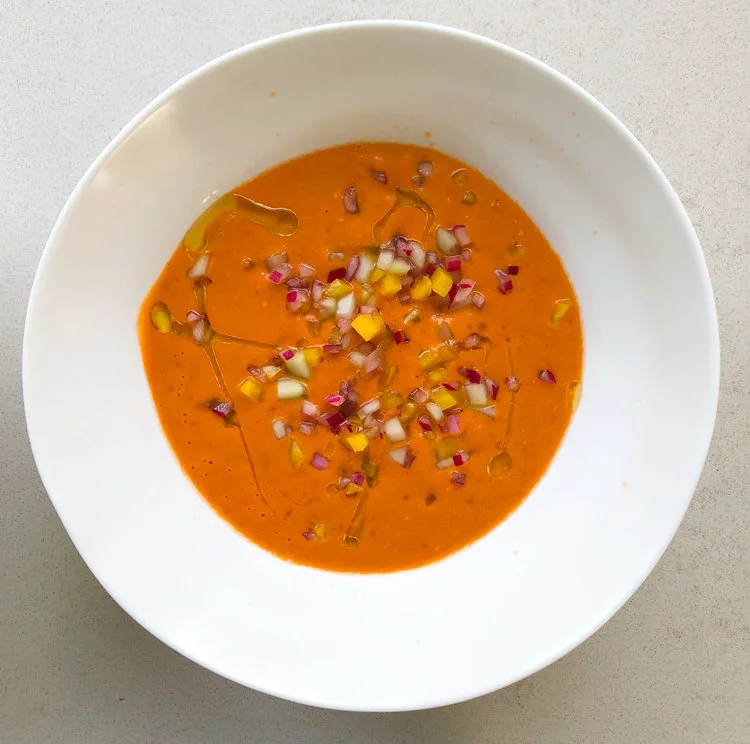
Beautiful and Delicious Gazpacho
Okay, I gave you a green Gazpacho a few weeks ago. Now, I hand you the red. This is the thing though, I make this exclusively with a Vitamix and really believe the results have something to do with the power of that machine. I have not tried this in a regular blender, but I think you should and just cut everything up a little smaller and maybe give it a little more time to blend for the best consistency. It is important to have a couple of key ingredients for this mostly flexible recipe.Good Sherry Vinegar and smoked Paprika are what I believe set it apart from mediocre to fabulous. Those two pantry items will not sit idle in your kitchen-you will get plenty of other use for them (to begin with, substituting them for other vinegars and regular paprika in your own recipes). Don’t go cheap here, please!

I like Gazpacho in all shapes and forms. The rustic stuff with big chunks of vegetables and lots of garlic is great. So is a more refined version I’ve had that was satiny smooth with no veggie pieces at all and just some jagged and delicious croutons for crunch. I am falling right into the middle with this super quick and easy recipe. First, you are going to blend the hell out of a few ingredients to get a creamy base, and then you are going to spend a few quality minutes with your very sharp knife and cutting board, finely dicing some veggies for texture. You can scatter these on top (like I did for the fancy photo), or mix them in and pour into a to-go cup for a quick and refreshing lunch. Croutons are up to you. I don’t tend to go for them here, but you can make something crispy and garlicky if you desire. I love drizzling a homemade herb oil on top (see below).
The best part of this whole cooking experience is NOT TURNING ON THE STOVE! Yay! Oh yeah, and it’s also beautiful and delicious!
Plain and Simple Delicious Gazpacho
Ingredients
1 small red onion, cut into 2 halves
1/4 cup of good sherry vinegar
2 medium cloves of garlic, smashed with a few pinches of salt, under the blade of your knife
1 large slice of white bread (gluten free or with gluten-no matter)
Around 5-6large farm tomatoes, cored and coarsely chopped (don’t worry about blemishes)
1 medium cucumber, peeled and seeded and cut into 2 halves
1 medium pepper (green or any other color will do if you can’t stand green), seeded and cored and cut into 2 halves
1 teaspoon of Kosher salt (or whatever salt you love)
2 teaspoons of smoked paprika
1/2 -3/4cup of EVOO
Optional, Basil or Parsley or Chives-Or no herbs at all! (I almost never use them), Croutons, any homemade herb oil for serving (blend a few handfuls of a fresh herb with 1/2 cup of EVOO and strain)
Method
Take one of the halves of the red onion and dice finely as you are able. Put in a small bowl and cover with the vinegar and let sit for 10-15 minutes. Get out the jug of your blender or Vitamix and toss in the garlic, bread, tomatoes, one of the halves of the of the cucumber and pepper (only roughly chop if using a regular blender), salt and paprika. When the onion has soaked, strain the vinegar into the blender, reserving the diced onion. Place the lid on and let her rip! I go to about medium speed on the Vitamix and that’s plenty. After a minute or two, pour in the olive oil through the top hole in the lid. Blend another 30 seconds and refrigerate immediately.
Take the other two veggie halves (cucumber and pepper) and dice as finely as the reserved red onion. Throw them in the same bowl and refrigerate too. You can eat this as soon as you like, really, but it’s best chilled for at least an hour and as long as overnight. Serve with a good handful of the diced veggies and a drizzle of your herb oil (if you have it). Serve it in cups, bowls, jelly jars, to-go mugs…