
Bespoke Granola
While wearing my private chef hat, I spend an inordinate amount of time weaving in and out of supermarket aisles. I sometimes get hung up in sections with too many choices (thanks, Libra sun!). Store bought granola baffles me. Seriously. I can’t understand why folks feel a need to buy a food that is so absurdly simple to make at home. Okay, I know not everyone has time or space for this, but it doesn’t have to be a major production! A sheet tray, a large mixing bowl, and some parchment will make it easier for you.

And the true beauty is that a recipe like this can be personalized to be your very own. Play around with the amount of sweetness (or type of sweetener!), add different spices or extracts, switch up the seeds and nuts, add a dried fruit (or not!)...Nobody else in the world will have granola like yours! Bespoke granola! Yay!

Read on. You are going to become a convert and spread the good word accordingly! No more standing in the cereal aisle with that look on your face, wasting your precious life! Do this now.
Bespoke Granola
Makes a LOT-about 8-10 cups (depending on how casually you measure things)
Ingredients
4 1/2 cups GOOD oats (this means Bob’s Red Mill!)
1 1/2 cups slivered almonds
1 cup large and unsweetened coconut flakes (Bob’s!)
1 1/2 cups pumpkin seeds
1/2 teaspoon salt
1/2 teaspoon powdered ginger
1 teaspoon cinnamon
1 teaspoon vanilla extract
3/4 cup liquid coconut oil (like this)
3/4 cup maple syrup (the darker the better)
1/3 cup dark brown sugar (or less or more)
1 1/2 large egg whites (1.5 liquid oz)
Method
Heat the oven to 325°. Spread parchment on two 1/2 sheet trays. Get your large bowl and dump all the ingredients into it. Mix well with your clean hands (or a spoon if you’re squeamish). Spread equally onto the two trays and bake for 40-60 minutes, switching trays around, until deep golden brown. If you can resist the urge to mess with it, there will be big glossy chunks of delicious granola. If it is baking unevenly and you need to move it around with a spatula, that is ok too! It will be less chunky, but still beautiful and delicious-my two favorite words.
Cool and keep in an airtight container. Or freeze in ziplock bags. Or share with people you love.

Nostalgia Alert! Flounder stuffed with Crabmeat
When I was a kid, we went out once or twice a summer with my grandparents. Usually to Captain Tobey’s Chowder House or Cy’s Green Coffee Pot, two Nantucket fixtures. Both had early bird specials and featured local dishes (think: Clam Chowder, Shrimp Scampi, Littlenecks on the Half Shell, Brown Bread (baked in a coffee can), and Indian Pudding-a story in itself for another day). We always ordered one precious Shirley Temple, which was HUGE, as we were basically never allowed processed food or shitty, sugary, chemically drinks, like soda. My favorite food to order was any seafood with stuffing. Shrimp and flounder were the two most popular-super savory and usually a little greasy and over-cooked, but somehow they hit the sweet spot for me. Salty, starchy, and filling, I would seriously about this treat all summer.
Those nights out were pretty rare and unusual, but I think what was more unusual is the way we ate at home with my grandparents during the summer. Looking back now, I know my grandmother’s take on food was out of the ordinary. The way she revered vegetables, growing them organically and making them the center attraction on a plate in the early 1970’s; her love of a great single piece of cheese; the maniacal cutting of recipes from the NYT food section each week; the excitement she shared when her first tomatoes ripened; the smells and sounds of coffee being ground and french-pressed every morning; I could keep writing for days...
I guess my point is that those couple of nights out had a glamour and appeal because they were foreign and rare. But the grounded, real and important eating in my life, the eating that has stuck with and inspired me the most, all happened right at home at her kitchen table.
We never did eat any “fancy” stuffed seafood at home, but last summer while eating a beautiful meal at Nantucket's beloved Ventuno Restaurant, the chef sent me and my husband a dish from the kitchen. A gorgeous piece of fresh flounder, stuffed with crabmeat and topped with roasted red pepper crema and fresh herbs. A total throwback and also a revelation! I immediately went to work figuring out the technique and cooking it for my client. It has become part of my repertoire now, easy and quick to prep and finished in a hot oven in 10-20 minutes. And it still totally hits that perfect savory spot, all these years later.

Crabmeat Stuffed Flounder with Red Pepper Crema
(Thank you for the inspiration, Ventuno!)
Makes 4 Stuffed Filets (two hungry people for dinner or four for lunch with salad and some good bread)
Ingredients
Stuffing
1/4 cup of very finely diced onion, scallion, or leek
1/4 cup of very finely diced bell pepper (any color)
1/4 cup of very finely diced celery
1 tablespoon of butter
1/4 teaspoon of dried thyme
1/4 cup of dry white wine
2 tablespoons of minced chives
1 tablespoon of minced parsley
1 teaspoon Worcestershire sauce
8 ounces of the best crabmeat you can afford (I like this brand)
1/3 cup of GF or regular panko breadcrumbs
1 egg
1 teaspoon of Dijon mustard
1 tablespoon of Mayonnaise
a generous pinch of salt and grinding of black pepper
4 filets of flounder, skin off (around 1/2 to 3/4 lb)
1 tablespoon of EVOO
Crema
1 large roasted red pepper (DIY or high quality from a jar)
1 small garlic clove, smashed with a little kosher salt
1/2 cup of EVOO
1 teaspoon sherry vinegar
salt and pepper
Method
Stuff the fish!
Oven to 400 degrees. Line a small baking tray with foil and grease it with some kind of oil or cooking spray.
Sauté the first three ingredients in butter over a medium low heat in a frying pan until they are soft-around 3-4 minutes. Add the thyme, stir, crank the heat to high and pour in the wine. The moment the liquid is evaporated, remove from the heat and stir in the chives, parsley and Worcestershire. In a large bowl, gently mix the crabmeat with the sautéed ingredients and panko. Beat the egg, mustard, mayo, salt and pepper and fold into the crabmeat mixture, trying not to break up the crabmeat too much. Gentle hands! (I actually use my hands to do this, as you may find a stray bit of cartilage and it really keeps from over-mixing).
Lay the filet flat with the skinned side up. Divide the filling and place a quarter of it on the bottom edge of each fish and carefully roll it up, not too tightly. Place on your prepared tray and drizzle with a bit of EVOO. Bake in the oven for around 15-20 minutes, until the stuffing feels firm and a little springy when you poke it. The fish will cook faster than the stuffing, but it will stay moist (and you will cover it with delicious sauce!).
Make the crema!
Sorry, but you need some sort of blender or food processor to do this. Puree the pepper with the garlic and slowly drizzle the oil in until the whole mess is emulsified. Add the vinegar and then taste for salt and pepper. Spoon over the fish to serve. Keep it super classy and chiffonade fresh basil to sprinkle on top.
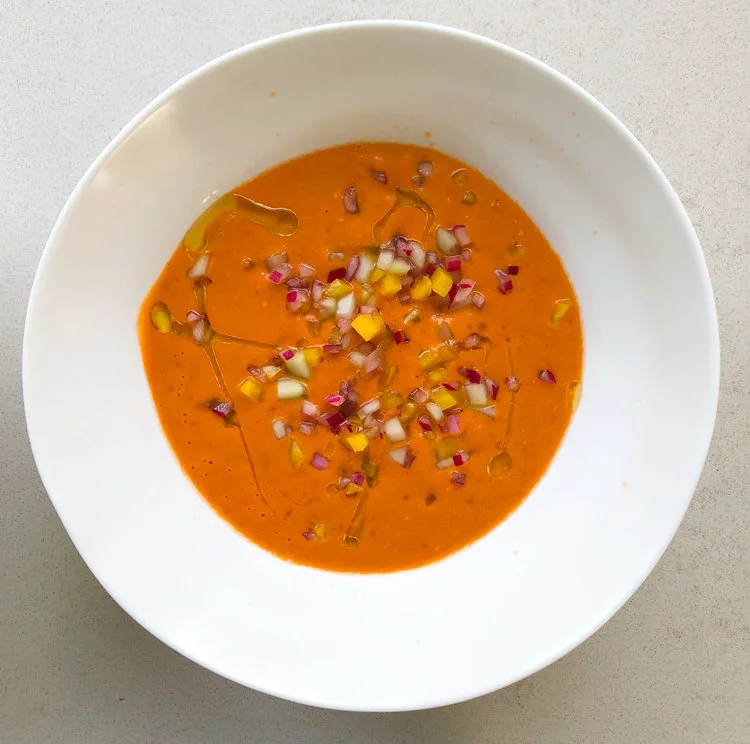
Beautiful and Delicious Gazpacho
Okay, I gave you a green Gazpacho a few weeks ago. Now, I hand you the red. This is the thing though, I make this exclusively with a Vitamix and really believe the results have something to do with the power of that machine. I have not tried this in a regular blender, but I think you should and just cut everything up a little smaller and maybe give it a little more time to blend for the best consistency. It is important to have a couple of key ingredients for this mostly flexible recipe.Good Sherry Vinegar and smoked Paprika are what I believe set it apart from mediocre to fabulous. Those two pantry items will not sit idle in your kitchen-you will get plenty of other use for them (to begin with, substituting them for other vinegars and regular paprika in your own recipes). Don’t go cheap here, please!

I like Gazpacho in all shapes and forms. The rustic stuff with big chunks of vegetables and lots of garlic is great. So is a more refined version I’ve had that was satiny smooth with no veggie pieces at all and just some jagged and delicious croutons for crunch. I am falling right into the middle with this super quick and easy recipe. First, you are going to blend the hell out of a few ingredients to get a creamy base, and then you are going to spend a few quality minutes with your very sharp knife and cutting board, finely dicing some veggies for texture. You can scatter these on top (like I did for the fancy photo), or mix them in and pour into a to-go cup for a quick and refreshing lunch. Croutons are up to you. I don’t tend to go for them here, but you can make something crispy and garlicky if you desire. I love drizzling a homemade herb oil on top (see below).
The best part of this whole cooking experience is NOT TURNING ON THE STOVE! Yay! Oh yeah, and it’s also beautiful and delicious!
Plain and Simple Delicious Gazpacho
Ingredients
1 small red onion, cut into 2 halves
1/4 cup of good sherry vinegar
2 medium cloves of garlic, smashed with a few pinches of salt, under the blade of your knife
1 large slice of white bread (gluten free or with gluten-no matter)
Around 5-6large farm tomatoes, cored and coarsely chopped (don’t worry about blemishes)
1 medium cucumber, peeled and seeded and cut into 2 halves
1 medium pepper (green or any other color will do if you can’t stand green), seeded and cored and cut into 2 halves
1 teaspoon of Kosher salt (or whatever salt you love)
2 teaspoons of smoked paprika
1/2 -3/4cup of EVOO
Optional, Basil or Parsley or Chives-Or no herbs at all! (I almost never use them), Croutons, any homemade herb oil for serving (blend a few handfuls of a fresh herb with 1/2 cup of EVOO and strain)
Method
Take one of the halves of the red onion and dice finely as you are able. Put in a small bowl and cover with the vinegar and let sit for 10-15 minutes. Get out the jug of your blender or Vitamix and toss in the garlic, bread, tomatoes, one of the halves of the of the cucumber and pepper (only roughly chop if using a regular blender), salt and paprika. When the onion has soaked, strain the vinegar into the blender, reserving the diced onion. Place the lid on and let her rip! I go to about medium speed on the Vitamix and that’s plenty. After a minute or two, pour in the olive oil through the top hole in the lid. Blend another 30 seconds and refrigerate immediately.
Take the other two veggie halves (cucumber and pepper) and dice as finely as the reserved red onion. Throw them in the same bowl and refrigerate too. You can eat this as soon as you like, really, but it’s best chilled for at least an hour and as long as overnight. Serve with a good handful of the diced veggies and a drizzle of your herb oil (if you have it). Serve it in cups, bowls, jelly jars, to-go mugs…

A Leek and Mustard Tart
Even though it is late August, I still occasionally feel the urge to turn on the oven and make my life just a little more sticky and uncomfortable. Tarts are one of my favorite baking mediums, particularly the savory variety. Once a tart is baked, it is great to have around, paired with a simple green salad as a classy lunch, served in a thin wedge with a glass of crisp white wine as an appetizer, or eaten cold out of hand as an on-the-go breakfast.
This recipe originally came from one of Deborah Madison’s early cookbooks. As a vegetarian during much of my youth, I was used to more hippie-type cooking (think Moosewood), and so when I read The Greens Cookbook in 1987, I was blown away. Hers were the first elevated and truly gourmet meatless recipes that I had ever seen. If you are a vegetable lover and haven’t read any of her work, please check her out. Her stuff is seriously inspirational. I have made this tart a million times and gradually adapted it as my own over the years.

I know that not everyone is comfortable with pastry, and tart pans can seem intimidating if you’ve never used one before. This pastry comes together quickly and is pretty forgiving. You don’t even need to roll it out or use those annoying little pie weights (which I will admit I’ve never owned in my life)! Sadly, the length of the recipe also makes it look difficult, but that is only because I am making it super specific for beginners. If you are an old hand at pastry, just make it however you like best.
The filling is quick and straightforward and the results will make you feel like you are sitting in a countryside bistro in the south of France. In fact, go get the bottle of rosé first, and chill it while you are making the tart. When it has cooled down enough to cut, grab your loveliest wine glass, a small plate, a blanket and find yourself the grassiest and most bucolic place to enjoy your beautiful creation.
Leek and Mustard Tart
(Adapted from Deborah Madison and Edward Espe Brown’s The Greens Cookbook)
Ingredients
Tart Crust
10 oz Gluten Free or all purpose flour (about 2 cups)
1/2 teaspoon of salt
7 oz cold unsalted butter, cut into small chunks (approximately 1 1/2 sticks)
1/2 cup of cold water with a few ice cubes
Filling
4 cups of thinly sliced leeks, white parts only, washed thoroughly to remove any dirt
1 tablespoon of butter
1 tablespoon of EVOO
1/2 teaspoon of salt
A few grinds of pepper
1/2 cup of white wine
2 tablespoons of white wine vinegar
2 eggs
1/2 cup heavy cream (see next ingredient note)
1/2 cup of creme fraiche or sour cream (you can also omit the previous heavy cream in the list and go for a full cup of creme fraiche or sour cream)
1/2 cup grated cheese (emmanthaler or gruyere please, but you can do goat, cheddar, or whatever you like, really)
2 tablespoons coarse Dijon mustard
1 tablespoon smooth Dijon mustard
2 tablespoons of minced chives, or parsley
1 teaspoon of minced tarragon
Equipment: 9 inch tart pan or pie plate
Method
Make the crust first.
Heat the oven to 375°. With food processor, pulse flour and salt with butter until the mixture is like very coarse cornmeal with some small pea-sized chunks. Pour in a few spoonfuls of the ice water and pulse again. Keep carefully adding small amounts of water until the dough just comes together. (If using a fork or pastry blender, work fast and blend the fat into the flour until it is the same consistancy as stated above. Stir the water in with a fork until the dough comes together). Quickly press the crust into the pan, keeping the dough to an even 1/8 inch thickness. Stick the whole thing into the freezer quickly and leave for about 15 minutes or so. Get a piece of tin foil the size of the pan and push it into the dough, leaving a little overhang. With a fork, pierce the bottom of the tart dough, about 5 times. Stick in the oven for around 20 minutes, until when you peek under the foil, the dough is dry looking and very light brown. Take out of the oven and cool for a few while you make the filling. Keep the oven on if you are going to bake the tart now!
Heat a large non-stick frying pan at a medium heat and add the butter and oil, when melted, add the leeks, salt and pepper. Stir for 10 minutes or so and then add the wine. Keep stirring for another 5-10 minutes, until the wine is evaporated and then add the vinegar and cook for a minute or two more. Find a medium sized bowl and break two eggs in and beat them for a couple of minutes with a fork or whisk. Add the cream combo, grated cheese, mustards and leek mixture and stir to combine. Pour into your crust and sprinkle the top with the herb(s). I usually stick any pie or tart onto a sheet pan that has been lined with foil, to avoid disastrous oven scenarios, so go ahead if you like. Stick in the oven and bake for around 20-30 minutes, until it is light brown on the top and stops jiggling when you give the pan a shake. Cool on a rack for as long as you can stand it and then get yourself to that bucolic location and pour the wine!

A Simple Summer Squash Soup
Well I guess if you complain enough, the hot weather eventually will become cold and grey, with a bitey north wind and spit-in-your-face precipitation. Lovely Nantucket!
On a positive note, the cool day gave me a chance to cook food and actually serve it hot. Yay! Best rainy day menu? Soup and a sandwich (okay, there was also a salad, because August-you know?). I looked around at Moor’s End Farm, took stock, and decided the soup would be summer squash and carrot, embellished with arugula pesto. The accompanying sandwich had to be Ruth Reichl’s infamous grilled cheese (don’t ask questions, just click on that link and make it as fast as you are able).

This technique is pretty standard. I could have used any allium or squash varieties for the soup. And the pesto variations are endless! (I’ll tell you all about pesto another day). The idea here again, is to not get wound up about having the exact variety of something. Try to roll with a growth type mindset as opposed to the fixed variety (that’s an education thing, kids).
In the meantime, try this soup on for size and let me know how it works for you.

Any Squash, Flexible-Mindset Soup
Serves 4
Ingredients
2 T ghee (or butter, or EVOO, or canola...)
1 leek (white to palest green part only), minced super finely (look on YouTube if you haven’t minced a leek before). Or use any other kind of onion you have on hand!
2 cloves of garlic, smashed, pressed, minced or grated
2 teaspoons of dried thyme (or 2 tablespoons fresh if you like)
3 medium carrots, scrubbed and roughly chopped (peel if you feel a desperate need)
1/2 a russet potato, peeled and chopped
3 cups of stock-I used chicken, but any kind will do. Or water!
1 bay leaf
3 small summer squash (or zucchini or patty pan...), roughly chopped (about 2+ cups)
1 cup of some sort of milk-dairy, soy, nut, coconut (I actually used cream, because I had some that needed to be finished)
Salt and pepper to taste
A few pinches of nutmeg (freshly grated is best)
Arugula Pesto (to finish)
1 clove garlic
1 tablespoon of nuts (I used toasted slivered almonds)
1/2-1 cup of arugula
1/2 cup EVOO
Salt to taste (about 1/4 teaspoon)
Method
Heat the fat at medium-low in a large skillet that has a lid (if no lid, a large sheet pan will suffice). Sauté the leeks for a few minutes, stirring, until soft. Add the garlic next, stirring still for just a minute, and then the thyme for another few seconds. Throw in the carrots, potato, bay leaf and stock, and crank the heat till it boils. Cover, turn down to lowish heat so the moisture simmers enthusiastically, and cook until the root vegetables are tender. Add the squash, cover again and leave till cooked through. Probably another 10-15 minutes.
While the soup is cooking, quickly whip up the pesto, either by using your fabulous knife skills and muscle, a mortar and pestle, or a food processor. The idea is to first chop/mash/pulverize the garlic and nuts together into a paste. Then stir/mash/add in the very finely minced arugula and salt. Pour in the oil last, stir to mix, and salt to taste. Set aside.
After the squash is tender but not mushy, remove the bay leaf, add the milk and carefully purée the mixture, either using an immersion blender, Vitamix, or regular blender. Taste for salt and give a grind of pepper. If it’s still hot, serve right away. If not, transfer it to a saucepan and keep warm over a very low heat. Serve with the arugula pesto, dolloped on top prettily.

Curried Chicken Salad Circa 1986
I have a confession to make. I own more than 500 hundred print cookbooks. There wasn’t enough space in my home and so my husband built a special giant bookcase for all of them. It’s hard, because I love them all and I also need to downsize pretty soon. I have a dream of going through them all and photographing the best recipes for my collection in Evernote. This will clearly never happen. I want to keep like 50 of them...well, maybe 100 tops...and Time Life Foods of the World counts as one, right? Oy vey. Please send help!
A couple of my favorites were released in the 80’s. Martha Stewart’s first book, The Silver Palate, and an old fish cookbook by Jasper White that has a killer recipe for gravlax made with bluefish (yes!). Something most of the books from that particular era have in common is a love of adding curry to dishes that don’t typically ask for it. I guess it was a thing back then? Curried chicken salad was definitely THE thing in those days. I have a nostalgic memory of my grandmother making it and loving every bite, except the ones with raisins. Raisins are my nemesis. Always were and always have been.

My chicken salad has pretty standard ingredients, but there is one that is new to me this year and I LOVE it! It is a curry paste in a tube from a company called Entube and it is fiery, fresh, and delightfully authentic. They also make harissa, molé, and umeboshi pastes. I highly recommend their products and at the moment, you can grab a tube at Bartlett’s Farm if you’re on island. If not, the internet is your bff.
If you need yet another chicken salad recipe (or tofu, if you’re into that sort of thing), then look no further. And be careful with that curry paste-it’s hot af and you might want to supplement it with some milder powder to keep the heat down. Okay! Ready, set, go!
Curried Chicken Salad
Ingredients
1 whole roasted chicken, torn and/or cut up into bite sized pieces. (Yes, it can be a rotisserie!)
Juice of two limes and the zest of one
2 stalks of celery, cut in fine dice
1 tiny red onion (or a quarter of a bigger one), minced finely
1/2 of a Granny Smith Apple, peeled, cored and finely diced
1 teaspoon of Entube Curry Paste (or less of you’re sensitive to heat)
1-2 teaspoons of less spicy curry powder (optional)
1/2-3/4 cup of mayonnaise, either Hellman’s or your own
1 tablespoon of Major Grey’s Chutney (avoiding the few super secret raisins hidden in the jar)
Salt to taste-about a teaspoon or so
A big handful of chopped cilantro
A big handful of toasted, slivered almonds
Method
Squeeze the lime juice onto the chicken in a large bowl. Fold in the zest and the rest of the ingredients, except the almonds. Serve in a pretty bowl with the nuts sprinkled on top.

Buy this now! Hi