
The Importance of Beets and Family Meals
As a kid, during our summers spent with my grandparents on Nantucket, we ate dinner together outside every night. My sisters and I would spend the later part of the afternoon running wild with neighborhood friends and around 6 o’clock we would hear the bell ringing (yes, Marjorie had a brass dinner bell!) and know it was time to get on our bikes and make our way home to help set the tables. There were two tables made of heavy cedar, and the adults sat at the large one in chairs with arms and my sisters and I sat at the smaller one on less comfortable benches. Every single night, we were expected to bring all of the place settings out on trays and then clear the tables at the end of the meal. Honestly, I never knew anyone else at the time who prepared for and ate dinner that way; with such care and intention. It was one of the few constants in a fairly chaotic and crazy childhood, and I still feel grateful for it every day.
My husband also cooks for a living and all of the young people who live with us in the summer work many long hours (a gaggle of 20-somethings, both related and honorarily related). Most nights, even when we get home late from our respective food jobs, we attempt to sort out some kind of dinner. Mostly big bowls of salad, something grilled and a sheet tray piled with a filling veggie or starch. We don’t sit at separate tables, rather finding a mismatched chair around the fire pit with plates in our laps. There is often storytelling, music and singing, and most importantly, shared family time involving food.

There are some dishes that were constants on my grandmother’s tables. One of my favorites was her simply prepared beet salad. Dark red beets (there really were only one kind back in those days), white wine vinegar, minced shallot, dill, oil, salt and pepper. That was it. I adored that salad and have made it a million times for my own family and clients too. I also make slightly fancier beet salads and here is one that you can either toss together messily, make pretty on a platter family style, or even plate individually if you are feeling fancy. I personally recommend family style, as that is my happiest way to eat.
Beet Salad with Feta, Mint and Hazelnuts
Feeds 2-4 depending on the appetite
Ingredients
1 bunch of small to medium sized beets (whatever kind you love best)
2 tablespoons of white wine or champagne vinegar
1/3 cup of crumbled feta (the best you can afford)
2 tablespoons of toasted hazelnuts
A handful of minced mint leaves
A healthy splash of your best EVOO
Salt and Pepper to taste (be careful as the feta is salty!)
Method
Cut the beet tips off, leaving about 2 inches of stem. Don’t bother washing them! Cook in a large pan of boiling salted water until you can easily stick a knife in the largest beet-about 20-40 minutes, depending on size (I use about a handful of kosher salt in all vegetable cooking water). When they are done, quickly run cold water over them until they are cool enough to work with. Cut the tops and tails off with a paring knife and the skins should slip off easily. This method also works for roasting beets. Slice into pretty rounds, about 1/8 inch thick.
If using a platter, scatter the rounds on it and slash evenly with the vinegar. Scatter the feta, then nuts, then mint over the beets. Splash with EVOO, grind a little pepper and sprinkle a little salt. Share with your loved ones.
If you are feeling casual, you can dice the beets and throw all the ingredients in a bowl together and serve over some lightly dressed greens. Or plate individually for a fancier look.
Cakelet: My new favorite word!
When I was a kid I loved baking, read Gourmet magazine religiously, and once sent away for an informational packet for a Kitchen Aid mixer. In the 1970’s, you had to fill out a form, cut it from the back of the magazine and send it in an addressed, stamped envelope. Considering my typical dysfunctional 70’s childhood, it’s remarkable that I was able to do all of these things. When the large yellow envelope arrived, I felt an incredible excitement and then total sadness as I read the cost of this dream machine (the equivalent of $300 now). I then went back to using my grandmother’s avocado green handmixer.
The lack of a Kitchen Aid did not stop me from passionately baking elaborate cakes and desserts all throughout my childhood. I was lovingly gifted one by my generous mother-in-law when I was pregnant with my now 23 year-old daughter. And although for many years I used it almost to death (along with the Kitchen Aids of many clients), I more recently have found myself reverting back to making many of my desserts with a small hand mixer or wooden spoon. They all do the same job in the end.

You don’t need a fancy mixer, but a hand mixer is handy...
This recipe can be made with a big kickass mixer, small handmixer, or wooden spoon. It looks a little long and complex for such a tiny outcome, but it is worth it for the sweet, cute, deliciousness! And it can be made a little ahead of time (same day) and looks very elegant finishing off a fancy dinner party. The best part of it in my mind however, is when you present it as a CAKELET, the best word ever! Now, get moving and make them!
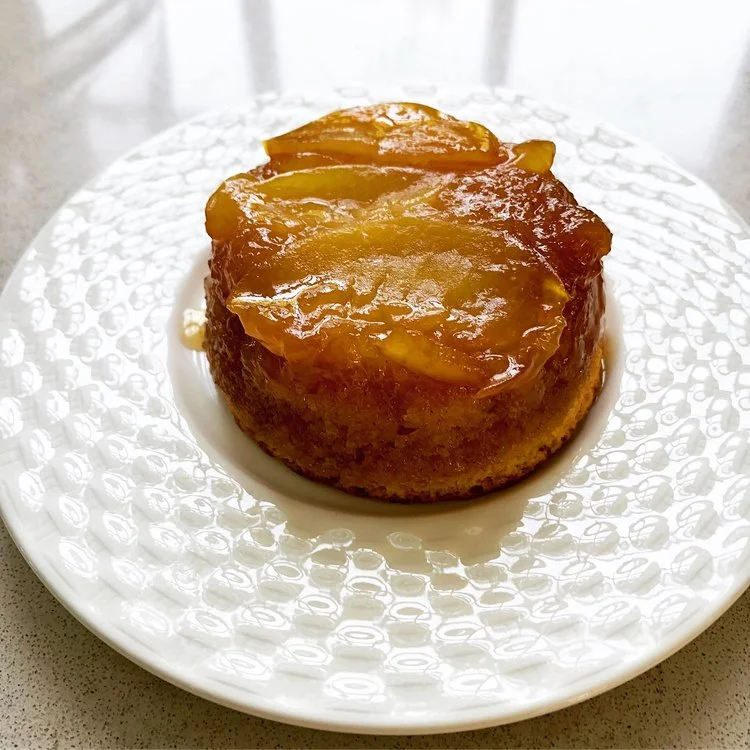
Caramelized Upside-Down Plum Cakelets
Makes 6 individual servings.
Ingredients
6 tablespoons + 4 tablespoons of unsalted butter, softened
1/3 cup light brown sugar, firmly packed
5 plums, pitted and sliced
3/4 cup gluten free flour
1/2 teaspoon baking powder
Big pinch of baking soda
1/4 teaspoon powdered ginger
Pinch salt
1/2 cup granulated sugar
Zest of 1/2 a lemon or orange
1 egg
1 teaspoon vanilla extract
1/2 cup buttermilk
Method
Preheat oven to 350°F. Butter the ramekins generously and place them on a small, parchment or greased foil-lined baking tray (I use a 1/4 sheet size and you will thank me for lining it in the end!). Melt 6 T of the butter in small saucepan over medium-low heat. Add brown sugar and whisk. It will separate and look super greasy at first, but persist and it will turn into a silky and smooth sauce. Pour carefully into equal amounts into the ramikins and place a fanned layer of plum slices right onto the sauce.
Sift the five dry ingredients into a smallish bowl.
Use an electric hand mixer (or wooden spoon) to cream the 4 T of butter with the sugar and orange zest. Add the egg and vanilla till combined. Alternately add the dry ingredients and the buttermilk to the batter.
Divide the batter into the ramekins and bake for 30 to 40 minutes, until the cakes are firm to the touch, and a toothpick or skewer inserted in the center comes out clean.
Cool on a rack until you can just pick them up. Run a small knife around the edges of the cake and flip onto small serving plates. If you buttered the ramekins well, the should come out easily. You may have a reluctant piece of plum to fish out and rearrange.
You can serve these warm or at room temperature. I love them with a little whipped cream that you’ve added a few spoonfuls of creme fraiche to...They don’t do quite as well the next day.

A chocolate cookie to end all cookies...
When the foodie internet was still youngish, I started following some of the pioneering food bloggers, dreaming that one day I too would be part of their special kids club. Well, work, motherhood, wifehood, life and all the rest of it gave me so many excuses not to find the time. I’m now trying to make up for that!
One of my favorite bloggers from the olden days is Clotilde Dusoulier, who does the impeccable Chocolate and Zucchini blog out of Paris. Her recipes (many of which are gluten free and vegetable forward) are among my favorites. This cookie recipe is all hers and I absolutely love it, so much that I never tweaked it one little bit! It’s a perfect recipe in that it is simple to prepare, easy to freeze and bake later, and can be eaten many ways (warm and gooey, cold and chewy, as a vehicle for carrying salty caramel ice cream to your pie hole...).

Here is how it goes:
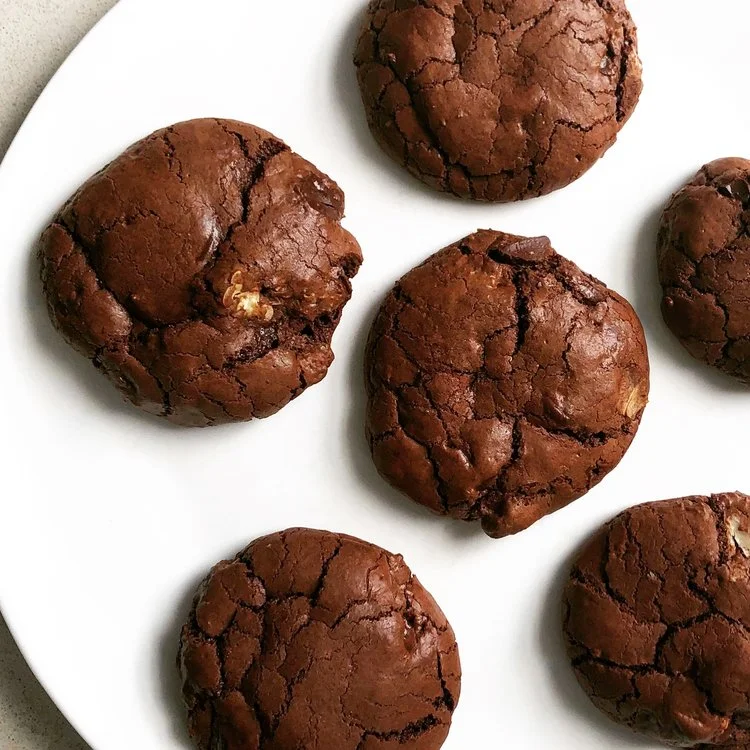
Pecan Mudslides (from Chocolate and Zucchini)
Ingredients
15 ounces of good bittersweet chocolate chips (Guittard Extra Dark 63%)
1/2 cup toasted pecan halves
2/3 cup sugar
2 1/2 tablespoons unsalted butter, softened
2 eggs, room temperature
1/2 cup gluten free flour (I am a fan of Cup 4 Cup)
1 teaspoon baking powder
- ½ teaspoon sea salt
Method
Makes 16 substantial cookies
Line a 9 inch square baking dish with 2 pieces of parchment that hang over the edges and act as handles when you grab them. Spray with a good nonstick cooking spray.
Reserve around 6 ounces of the chocolate and set aside in a bowl with the pecan halves.
Melt the remaining chocolate in a heatproof bowl set over a pan of simmering water, stirring regularly until smooth. Set aside to cool slightly.
Cream together the sugar and butter until fluffy. Add the eggs one at a time, mixing well after each addition.
Combine the flour, baking powder, and salt in a bowl, then add that to the previous batter, mixing until just combined.
Add the melted chocolate, mix until just combined, then add the reserved chocolate and pecans and stir them in.
Pour the mixture into the prepared baking dish and spread it into an even-ish layer with a spatula. Place in the fridge for 20 minutes.
Preheat the oven to 375°F and line a baking sheet with parchment paper.
Remove the dough from the fridge and cut the dough into 16 pieces.
Roll each piece into a ball and place on the tray.
(If you want to freeze some to bake later, stick them in the freezer now until solid, then transfer to a ziplock bag or container. Bake without thawing.)
Bake for 15 minutes (16 if they were frozen), until the surface is just set, but still soft when gently pressed in the middle. Let the cookies settle on the baking sheet for 20 minutes before transferring them to a rack to cool completely.